Music is the universal language
“Glory to God in the highest heaven, and on earth peace to those on whom his favor rests.” - Luke 2:14
Premier Guitar

Who's No. 1? Let the Debate Begin!
PG's video crew discuss & debate what band has rocked the U.S. music scene the most in the last 75 years.
D’Addario Introduces the Micro-Fiber Polishing Mitt
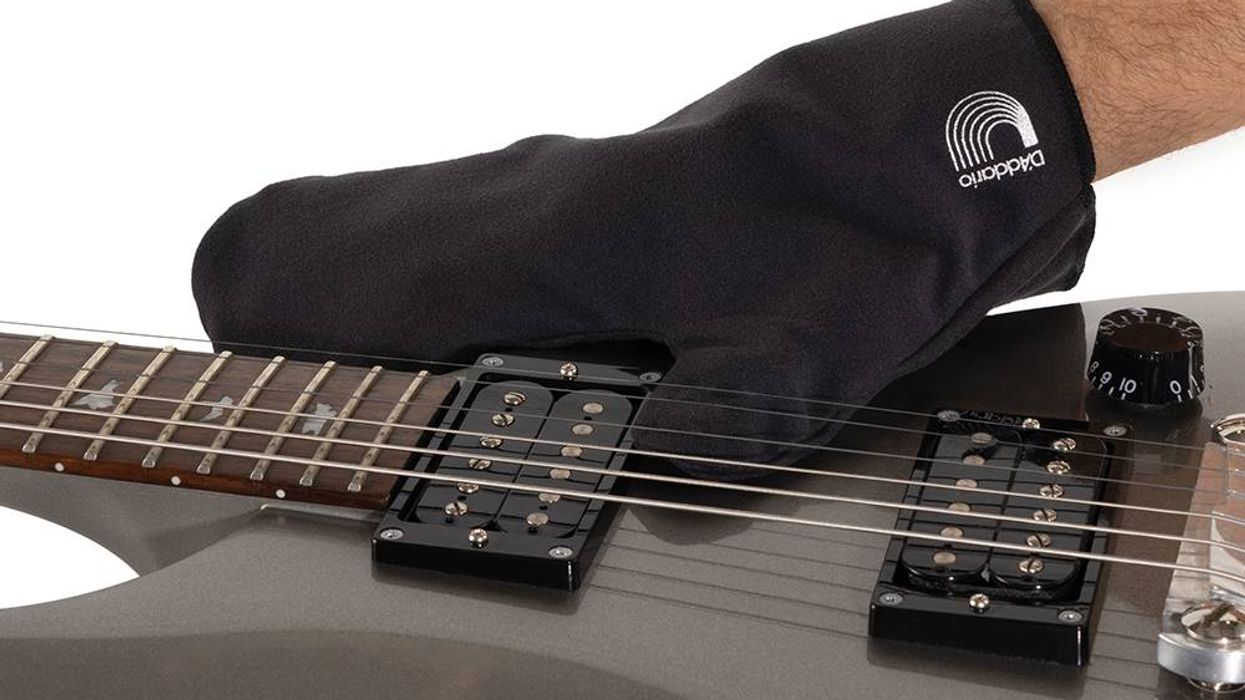
D’Addario announces the Micro-Fiber Polishing Mitt: a reusable, chemical-free cleaning tool that keeps instruments looking and sounding their best. Made with ultrafine microscopic fibers, the mitt removes dust, dirt, oils, and smudges, offering a fast, safe alternative to traditional cloths and harsh polishes.
Designed for Precision Cleaning
The wearable mitt design fits right over the hand, giving players maximum control when cleaning tricky areas like under strings, around hardware and tuning pegs, or inside cutaways. It’s also ideal for gently wiping down strings to help extend lifespan and preserve tone. The Micro-Fiber Polishing Mitt is durable, machine washable, and designed to last.

Key Features
- Chemical-Free Cleaning: Removes dust, dirt, and oils without sprays or polishes.
- Wearable, Precision Design: Fits over the hand to reach tight spots with ease.
- Safe for All Instruments: Ideal for guitars, basses, keyboards, drums, and more.
- Supports String Longevity: Gently cleans strings to help maintain tone.
- Reusable & Washable: Built for long-term use; cleans easily with soap and water.
Availability & Price
The Micro-Fiber Polishing Mitt is available now through daddario.com and authorized retailers. Street price: $7.99.
For more information, visit: https://bit.ly/polishmitt-pr
PRS Guitars Announces SE Ed Sheeran “Cosmic Splash” Limited Edition
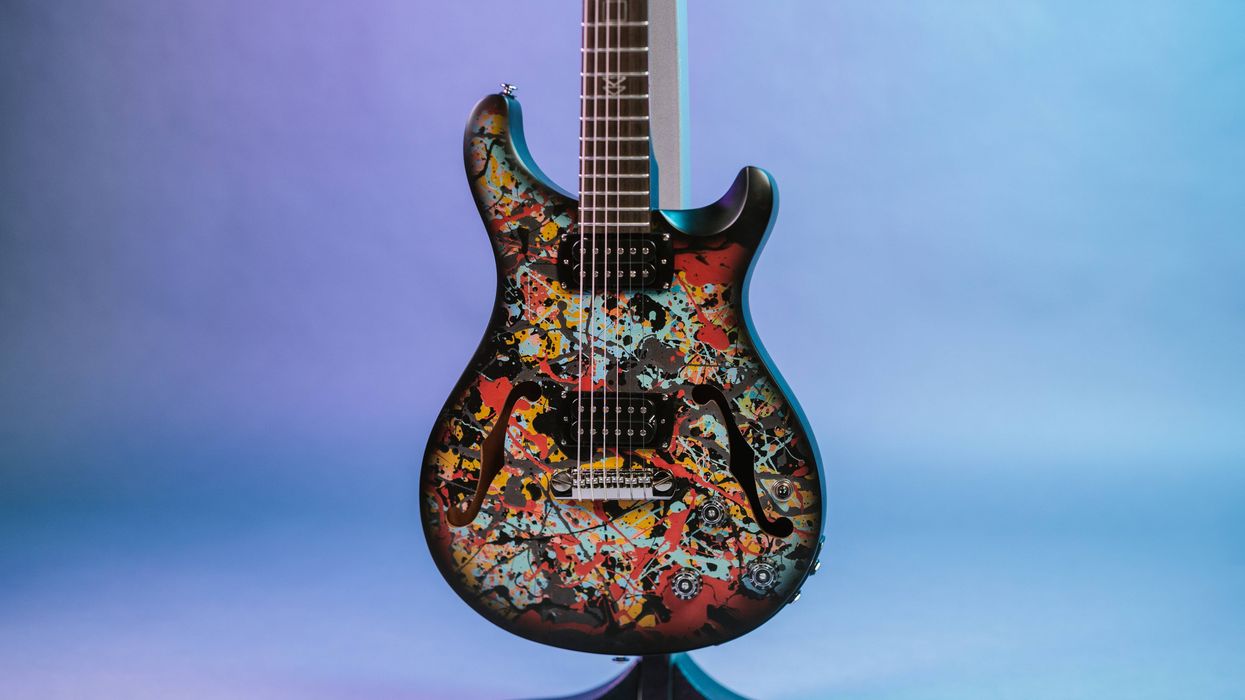
PRS Guitars today announced the SE Ed Sheeran “Cosmic Splash” Limited Edition guitar. Designed in collaboration with Ed Sheeran, this SE Hollowbody I Piezo Baritone model marries Sheeran’s passion for songwriting with his offstage love of painting. The SE “Cosmic Splash” model features the exact design from one of Sheeran’s 2025 Cosmic Carpark paintings, a series of original artworks he sold last year to raise funds for the Ed Sheeran Foundation. As an added bonus, every guitar will ship with an 8” x 8” print of the same Cosmic Carpark painting that is on the guitar body, hand signed by Ed Sheeran. Only 1,000 pieces will be available worldwide. This is the first PRS collaboration with Sheeran that is available for purchase. It is also the first-ever hollowbody baritone in the PRS catalog.

The fretboard inlay is a nod to the musician’s new “Stereo” album series– Play, Pause, Rewind, Fast-Forward, and Stop – with the Play icon also featured on the truss rod cover.
"I started painting as a way to stay creative when I am off the road,” said Ed Sheeran. “I often say ‘keep the faucet running’ when it comes to songwriting – it’s so important to stay in a creative headspace to get to the really good stuff. My hope is that people find this instrument as inspiring as I do. To have my artwork on it as well is such a treat.”
The SE Hollowbody I guitar features the PRS/LR Baggs Piezo system, 85/15 “S” pickups, and a 27.7” baritone scale length. Players can isolate or blend the piezo’s acoustic voice with electric power for myriad creative options. The slimmer, contoured “flatback” design of the Hollowbody I melds the back design of an electric guitar with the rich, open tone and airy acoustic depth of a hollowbody. The full rundown of specs is available on prsguitars.com.
This is not the first time PRS has worked with Sheeran to create a unique guitar. Last summer, the collaboration led to a one-off SE Hollowbody Baritone custom painted and featured in the video for Sheeran’s song “Drive,” written exclusively for the soundtrack to the Apple Original Films’ blockbuster “F1: The Movie.” Sheeran has been playing PRS for his choice of electric guitars since 2018. He currently has a Hollowbody II in a Prism Dragon’s Breath finish with bing cherries on the fretboard, a one-off purple Silver Sky gifted to him by John Mayer, and a stock Custom 22.
For all of the latest news, click www.prsguitars.com and follow @prsguitars on Instagram, Tik Tok, Facebook, X, and YouTube.
SYNERGY Amps Releases the All New SYN-20IR 1x12 All-Tube 20 Watt Combo
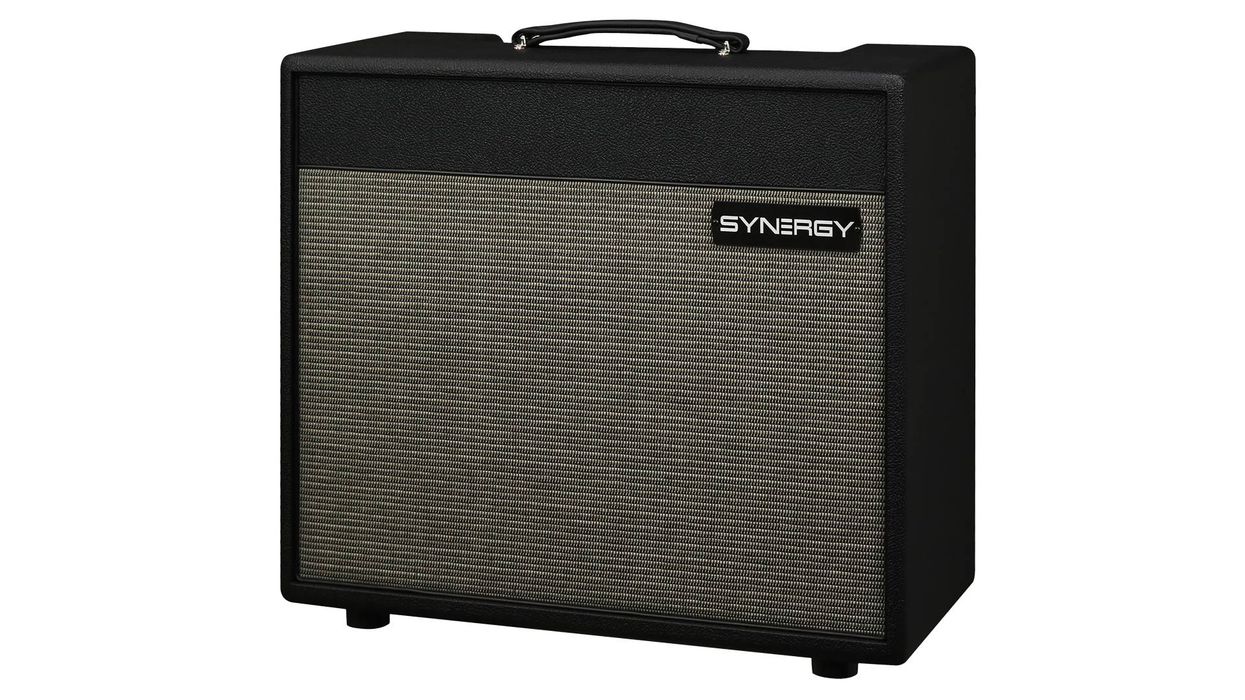
Synergy Amps proudly announces the SYN-20IR 1x12” Combo Amp, a compact, USA-built powerhouse that delivers a full collection of iconic amplifier tones in one versatile design. In a milestone first for the company, Synergy also introduces the SYN-20IR Combo Custom Shop, offering players custom-finished options that pair world-class tone with personalized aesthetics.
Designed and built in Commerce, California, the SYN-20IR Combo combines Synergy’s modular all-tube platform with a Celestion Vintage 30, delivering authoritative tone, dynamic response, and unmistakable feel. At the heart of the amp is Synergy’s acclaimed swappable preamp module system, allowing players to access an expanding lineup of legendary amp voices—without replacing their amplifier.
Engineered for modern players, the SYN-20IR features selectable power-amp modes, low-latency onboard IRs, silent play capability, and full MIDI control, making it equally at home on stage, in the studio, or in a quiet practice environment. The result is uncompromising tube tone with the flexibility today’s sessions and performances demand.
With the introduction of the SYN-20IR Combo Custom Shop, Synergy brings a new level of individuality to the platform. Players can now choose custom finishes that reflect their personal style while retaining the boutique craftsmanship, USA-built quality, and stage-ready versatility that define Synergy Amps. It’s a distinctive new chapter for the SYN-20IR—where iconic tone meets custom expression.
About Synergy Amps
Synergy Amps is the leader in modular tube amplifier technology, bringing together iconic amp designs from the world’s most respected builders. Handcrafted in the USA, Synergy products empower guitarists with unmatched tonal flexibility, authentic tube feel, and uncompromising sound quality.
For more information, visit synergyamps.com or contact Synergy Amps, Commerce, California.
Cort Guitars Introduces the Space G6TR Headless Electric Guitar
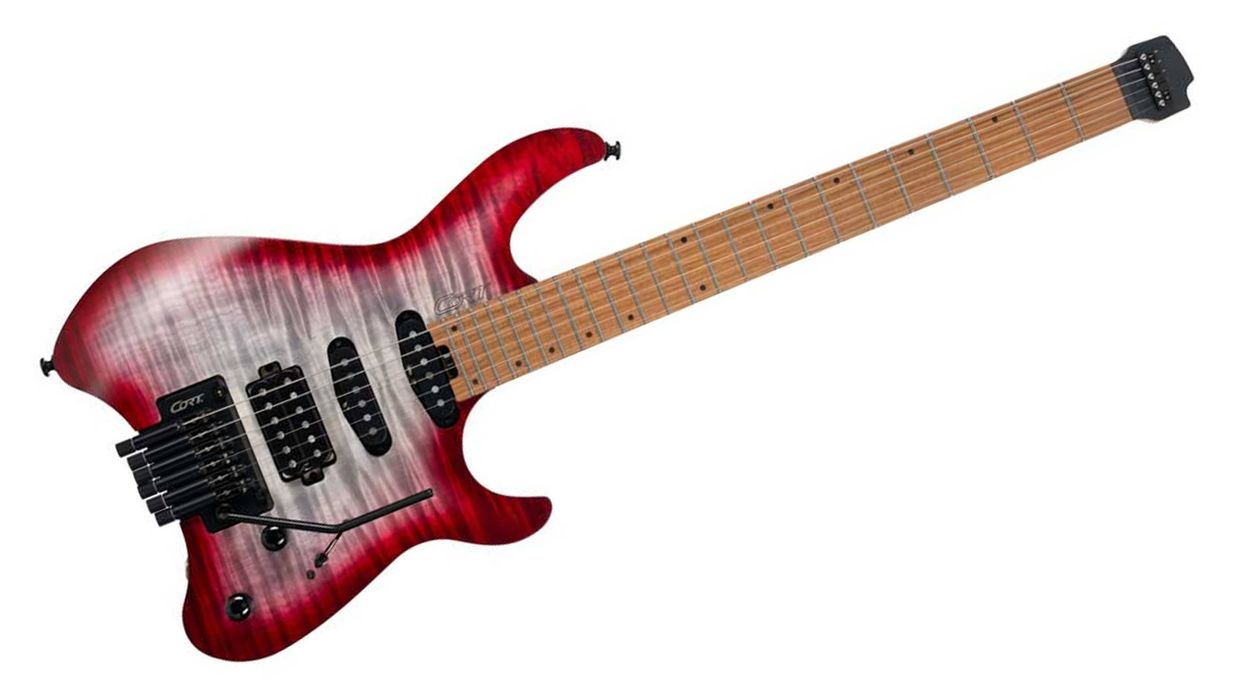
Cort Guitars announces the launch of the new Space G6TR, a headless electric guitar created for players who demand light weight, perfect balance, fast playability, and modern tonal flexibility. Built for real-world performance situations and crafted with custom hardware developed specifically for its design, the Space G6TR delivers stability, travel-friendly practicality, and confident tuning control. Available now worldwide through local retailers and online, it brings players an advanced instrument designed to inspire, with the goal of combining expressive feel, sonic range, and stage-ready reliability.
The Space G6TR features an okoume body topped with a flamed maple veneer, presenting a striking look paired with resonant tone. Its bolt-on, five-piece roasted maple and walnut neck is built for strength and stability while keeping a comfortable feel, paired with an ergonomic Ergo V neck profile that measures 21 mm at the first fret and 23 mm at the twelfth fret. A 25.5-inch (648 mm) scale length ensures familiar tension and response, while the roasted maple fingerboard with a 12–15.75-inch compound radius supports fast, accurate playing across all 24 stainless steel tall medium-jumbo frets. Black dot inlays are complemented by luminous side dots for visibility in dark performance environments. The guitar includes a PPS nut measuring 42 mm (1 21/32”) in width, a matte neck finish, and is available in Semi-Gloss Lava and Semi-Gloss Lagoon finishes.
Electronics are centered around an HSS configuration designed to deliver range and clarity. The Cort Voiced Tone VTS63 and VTH77 pickup set works with a five-way selector to provide access to a wide spectrum of tones, from smooth cleans to powerful leads. Simple, intuitive control is supported through a single volume and single tone layout, keeping the focus on musical expression while offering tonal versatility suitable for multiple genres and playing styles.
Hardware has been purpose-built for this model, with specially designed headless tuning hardware and a custom headless tremolo system created to provide expressive pitch control while keeping tuning stability and reliability under aggressive playing. A proprietary headpiece and tailpiece system enhances long-term performance, while a two-way adjustable truss rod with spoke-nut access supports easy setup adjustments. The guitar ships with D’Addario EXL110 strings, features black hardware, matte neck finish, and includes a gig bag.
For additional details and images of the new Cort Space G6TR, please visit NAMM Booth #6810 or online at www.cortguitars.com.
Street Price: $879.99 USD
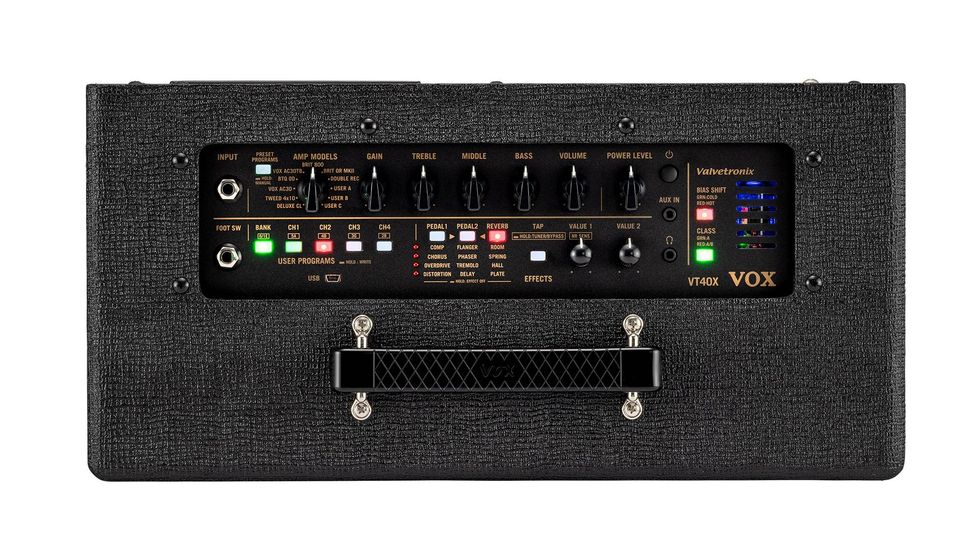
VOX Introduces New Valvetronix VT20X and VT40X Amplifiers
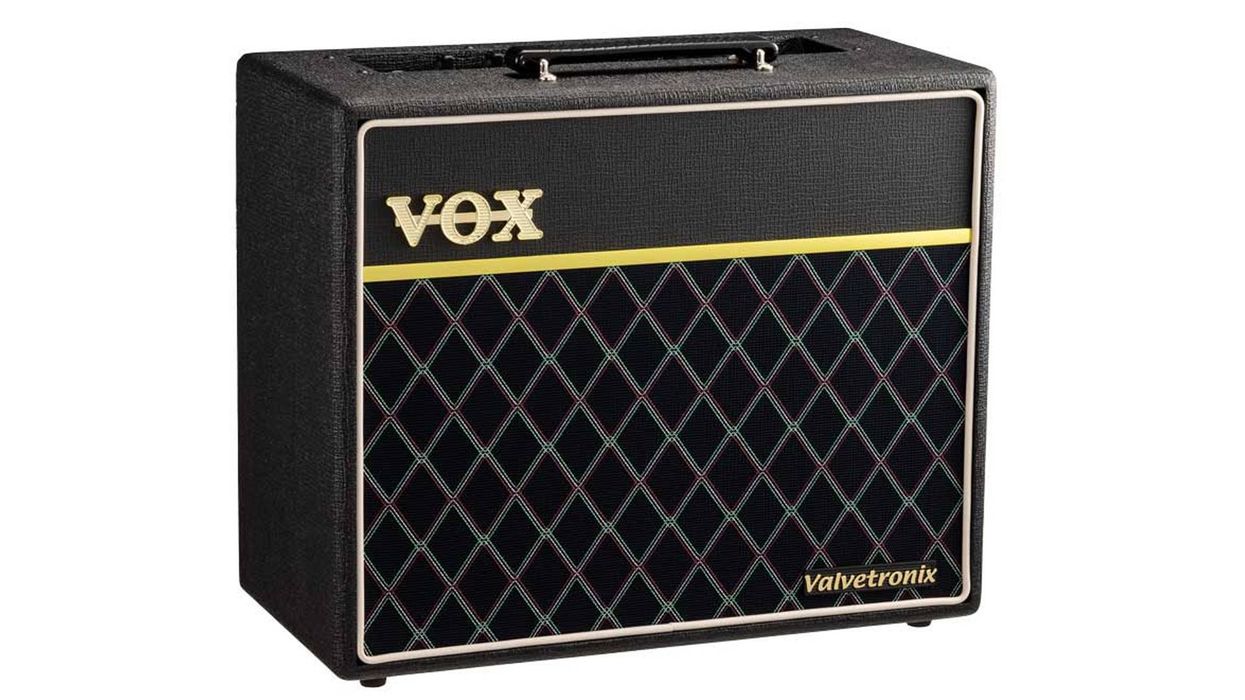
Celebrating the 25th Anniversary of its renowned Valvetronix series, VOX announces the worldwide release of the new VT20X and VT40X guitar amplifiers. Available now through local retailers and online, these amplifiers are designed for players who want the authentic feel of classic tube amps with the flexibility and precision of advanced digital design. By combining sophisticated new modeling technology with a multi-stage tube preamp circuit, VOX set out to answer the need for an amplifier that delivers the distinctive distortion, touch sensitivity, and dynamic response of treasured vintage tube designs, while offering modern control and versatility for today’s guitarists.
The VT20X and VT40X Classic Blue models are a bold evolution of the Valvetronix concept. Their all-new modeling algorithm recreates the analog circuits of some of the world’s most coveted tube amplifiers at a circuit level rather than relying on simple tonal snapshots. This deep level of modeling allows musicians to adjust gain structure, switch between Class A and Class AB operation, and fine-tune the amplifier bias in real time, producing subtle tonal shifts and responsive interaction that behave like genuine tube circuitry. At the heart of the design is a 12AX7 tube integrated further into the signal path than in earlier generations, delivering enhanced warmth, natural compression, and the kind of “edge of breakup” sensitivity that responds directly to player touch and guitar volume control.
The refined balance between DSP and tube architecture results in harmonically rich tones with smooth clean-to-crunch transitions and expressive overdrive characteristics. Whether dialed back for shimmering clarity or pushed harder for dynamic drive, the amps respond musically, with the kind of sag, bloom, and bite traditionally associated with classic tube amplifiers. This tube-forward approach is complemented by VOX’s advanced VET+ technology, delivering tube realism that feels authentic under the fingers and translates naturally across playing styles.
Beyond their core amp tone, the VT20X and VT40X also offer a comprehensive sonic toolkit for modern guitarists. Players can pair realistic amplifier models with classic effects inspired by iconic stompboxes, creating polished, performance-ready sounds without the need for a large pedalboard. Each amplifier is housed in a tightly sealed cabinet featuring VOX’s proprietary bass-reflex design for extended low-frequency depth and projection, ensuring the amps sound full, controlled, and present in a range of environments.
Thoughtful practicality rounds out the design, making the VT20X and VT40X Classic Blue amplifiers equally at home in rehearsal, recording, or performance settings. Both models feature a USB port for direct connectivity, a built-in tuner, an AUX input for external audio sources, and a headphone output for silent practice. The VT20X delivers 20 watts of power through an 8-inch speaker, offering compact portability with impressive responsiveness, while the VT40X provides 40 watts through a 10-inch speaker for greater headroom and stage capability. As an homage to the original series launched in 2001, each carries the striking Classic Blue aesthetic, featuring a bold split-front design with vintage-inspired blue grille cloth that recalls VOX heritage while presenting a confident modern presence.
With deeper tube integration, refined circuit-based modeling, expressive tonal flexibility, and practical player-focused features, the new VT20X and VT40X reimagine the hybrid amp experience for a new generation while staying true to the musical feel that made Valvetronix a favorite among guitarists worldwide.
For more details and full specifications on the VT20X and VT40X amplifiers, please visit NAMM Booth #6802 or online at www.voxamps.com
Street price:
VT20X $279.79 USD
VT40X $399.99 USD
Esoterica Electrica: On Our Way to the Top
It’s a long way to the top if you want to rock ’n’ roll—or so the saying goes. On the surface, that sounds like a blunt, self-evident truth. But the longer I think about it, the more I suspect it’s not just incomplete, but misleading. That idea—that there is a clearly defined “top,” and that reaching it is the point—has quietly infected far more than music. It colors how we measure success in almost everything we do.
In sports or business, the metrics are tidy. You win or you lose. You’re ranked, valued, traded, promoted, or cut. The scoreboard doesn’t lie, even when it’s cruel. But music isn’t a ladder, and it isn’t a tournament. So why do we keep pretending it should be judged like one? Does being a musician really require a podium?
Most of us will never be inducted into the Rock & Roll Hall of Fame, and I doubt that possibility crosses anyone’s mind when they first pick up an instrument. That kind of recognition might be a pleasant side effect of a life in music, but making it the goal feels like the opposite of what art is meant to be. History bears this out.
“Playing in a band is inherently collaborative, cognitively demanding, and demonstrably good for your brain.”
Consider the Beatles—arguably the most successful and influential band in popular music. They didn’t set out to conquer the world. They wanted to write songs, make records, and play shows. Early on, they joked about reaching the “topper-most of the popper-most,” a phrase that sounded aspirational but probably felt abstract at the time. In practice, that ambition looked like four musicians—and their roadie, Neil Aspinall—crammed into a cold, smelly van, hauling gear through grim northern English towns, grinding out one-night stands. But that was the life of a rock ’n’ roll musician.
Which raises an interesting question: What does “the top” mean for the rest of us? An album credit? A few good club gigs? A song that lands with someone at the right moment? Music has never guaranteed financial success, and our education system seems to understand that all too well. As schools increasingly resemble business pipelines, music programs struggle for survival while sports budgets grow practically unchecked.
I’ve watched from the sidelines as stick-and-ball sports have exploded in K-12 education. Competitive athletics have existed in schools for more than a century, originally emerging from physical-education programs designed to improve general fitness—especially after World War I exposed how unprepared many young Americans were. But sports weren’t always industrialized the way they are now. Today, despite near-lottery odds of making a living as an athlete, parents and institutions often behave as if success is just a scholarship or draft pick away.
The incentives are revealing. DePaul University can lay off more than a hundred employees while planning a $42 million sports center, justified as a student recruitment tool. Team building and collaboration are the stated virtues, but let’s be honest—we worship individual stars. Music, meanwhile, is treated like a luxury.
That’s odd, because music delivers many of the same benefits, without the head injuries. Anyone who has stood in a crowd at a concert knows the tribal electricity is no different from a packed sports stadium, except everyone goes home a winner. Playing in a band is inherently collaborative, cognitively demanding, and demonstrably good for your brain. Yet music education is often marginalized or eliminated entirely. I’m not suggesting everyone should become a musician, but teaching respect for art, and how to listen to it, is valuable for everyone.
For more than half a century, musicians have driven fashion, shaped advertising, defined film soundtracks, and filled the spaces we inhabit—from cars to elevators to restaurants. You can escape sports coverage if you want to, but you can’t escape music. It sets an emotional tone, reflects social mood, and quietly binds communities together. Playing music isn’t decorative; it’s functional, social, and deeply human.
Twenty-five years after those freezing van rides, two of the three surviving Beatles stood onstage in 1998 as the band was inducted into the Rock & Roll Hall of Fame, then only in its third annual ceremony. I’m guessing it wasn’t as much fun as a real gig. Watching artists of that stature squirm through acceptance speeches suggests the honor itself was never the destination. Music was.
That’s the thing: when you’re infected with the boogie-woogie, the reward isn’t a trophy—it’s the playing. In that sense, we’re already in the Hall. If we share the joy, value the process, and savor every note we play or hear, maybe it turns out it isn’t such a long way to the top after all.
Orange Amps OR60 UK-Built All-Valve Guitar Amp
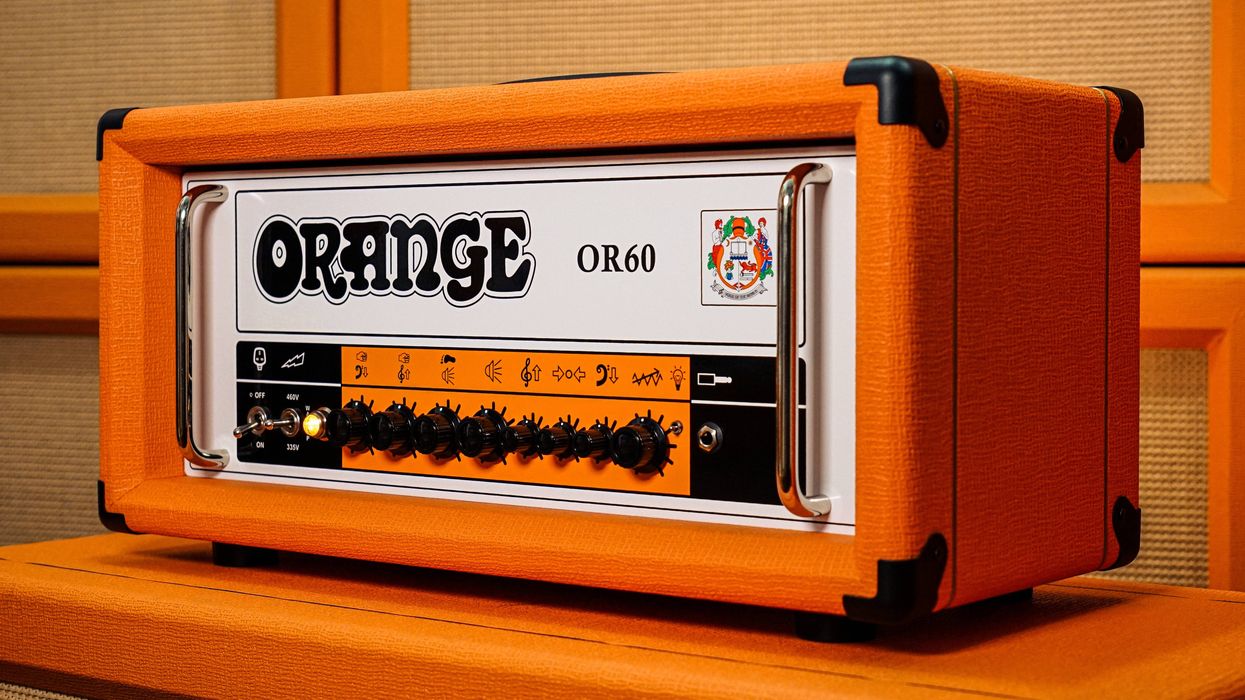
Orange Amps is pleased to introduce its latest, UK-built, all-valve guitar amp head, the vintage inspired single channel OR60. The 60-Watt amp delivers focused, harmonically rich valve tone with a modern edge. It is generous in clarity, tight in the lows and voiced to take boosts beautifully. It’s modern Orange tone, designed to go hard!
Designed and made in the UK with premium components, the OR60 is driven by a pair of 6L6 power valves which give the head extensive headroom and depth, especially with a boost pedal in front. A second footswitchable volume control provides effortless solo cut-through or rhythm / lead switching without touching the gain. Because the gain is not touched, the core tone remains consistent, simply louder or softer as needed. Plus, the switchable 460V / 335V (60W / 30W) output allows guitarists to push the amp harder at lower volumes. This versatility, with zero tone compromise, is a powerful feature for live guitarists or studio setups, making the OR60 incredibly playable, whatever the style.
The dedicated Presence and Resonance controls offer customisable tone-shaping and fine tuning, allowing players to shape the high and low-end power amp stage to suit any cab or room. The Presence control adjusts high-end response for consistent clarity and harmonic definition helping a guitar cut through the mix. The Resonance control allows users to dial in low-end response and tailor the amp’s feel and depth to their playing style, whether it’s percussive tightness for modern metal or more classic booming bottom end.
The three position Bright switch adds two flavours of bite and definition to darker pick-ups, and brings extra snap and sparkle to clean tones. It allows players to sculpt the amp’s top-end voicing without affecting the overall gain character. When engaged, it lifts the treble response giving extra clarity and presence, which is particularly useful with humbuckers or darker-voiced guitars. When it is switched off (middle position) the tone is smoother, warmer and rounder. This small tweak has a big impact when players move between guitars or genres mid-set.
The amp's simple design is its key: just the straight-up, high-voltage voice of a masterfully designed single-channel amp, ready to be played raw or augmented with the valve-buffered FX loop. Simple, solid, and seriously loud. The bold design of the OR60 is instantly recognisable with its classic pics-only controls and signature orange Tolex finish. Built to perform and for a lifetime on the road or in the studio it is tour-tough and gig-ready.
The OR60 is the most versatile single-channel amp Orange Amps has ever built. With serious power and exceptional responsiveness, it moves effortlessly from glassy chime to classic crunch and well beyond, all delivered with Orange’s iconic British tone.
To find out more please go to www.orangeamps.com.
VOX Introduces the VTB-1 Treble Booster Pedal
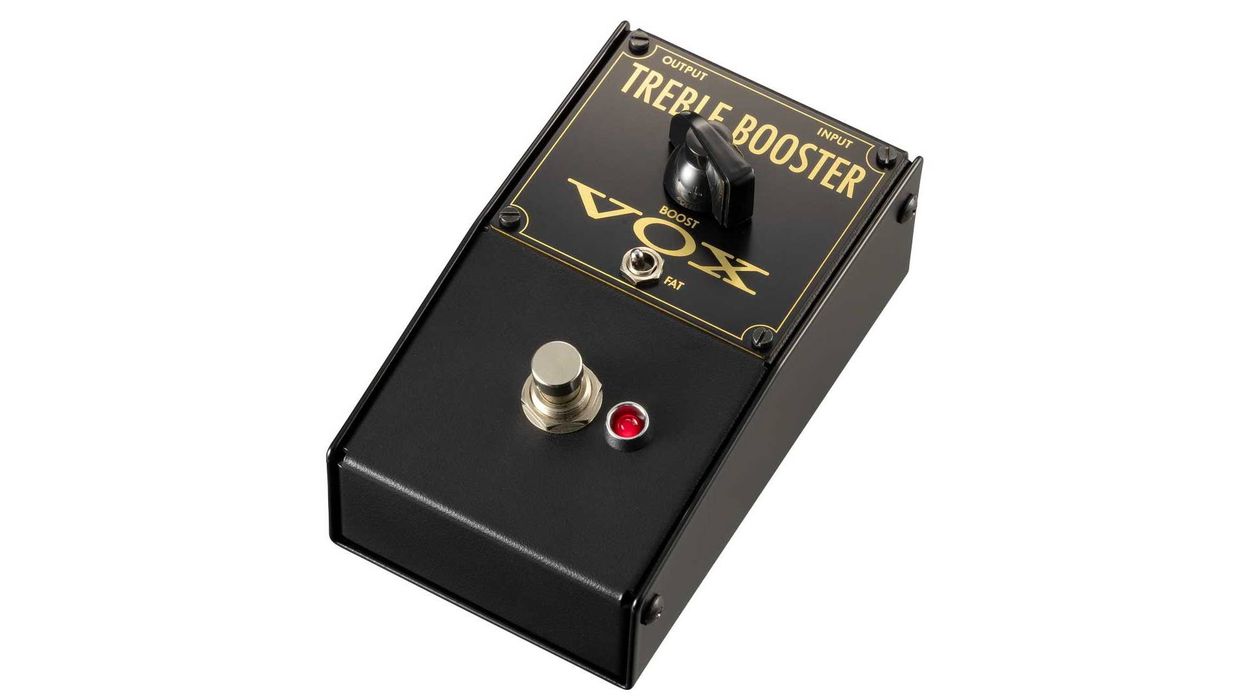
VOX announces the VTB-1 Treble Booster, a new effects pedal designed to faithfully recreate the unmistakable voice of classic British treble boosters while introducing the stability, predictability, and reliability required by modern players. Available worldwide through local retailers and online, the VTB-1 answers the demand for authentic vintage tone by preserving the musical response, touch sensitivity, and expressive drive associated with historic designs, while eliminating the temperature sensitivity, noise issues, and performance inconsistencies that defined early Germanium-based pedals.
The VTB-1 revisits one of rock guitar’s most defining sonic relationships: the energetic, harmonically rich overdrive achieved when a treble booster pushes an amplifier into its sweet spot. Traditional treble boosters achieved their character through Germanium transistors, celebrated for their nonlinear behavior but infamous for fluctuating performance. VOX engineers approached this challenge from a purely tonal and technical standpoint, performing detailed analysis of multiple original units and spending months modeling their characteristics to authentically capture the wide nonlinear operating zone that players value without relying on outdated technology.
Central to this design is a carefully biased single-transistor gain stage, built around a hand-selected Silver Can BC108 Silicon transistor chosen specifically for its consistency, low noise, and convincingly vintage playing feel. Rather than narrowing the sounding range, VOX engineered the VTB-1 to expand the pedal’s sweet spot, ensuring a broad and expressive “edge-of-breakup” region that responds naturally to player touch. This delivers the smooth, progressive onset of drive, singing harmonic content, and exceptional cleanup via the guitar’s volume control that defines great treble booster tones. Supporting components, including modern thin-film resistors, further contribute to the pedal’s exceptionally low-noise performance, helping it remain remarkably quiet compared to period designs.
In operation, the VTB-1 stays intentionally simple yet musically flexible. Players can roll back their guitar’s volume for sparkling, chiming cleans with clarity and articulation or increase the Boost control to drive their amplifier into harmonically saturated overdrive with focused presence and impressive headroom. A thoughtfully implemented Fat Switch widens the boosted frequency range when desired, allowing the pedal’s voice to move from crisp, cutting vintage articulation to a fuller, more powerful tonal footprint tailored to different instruments and playing styles.
The VTB-1 is designed as both a homage and a modern tool. It keeps the spirit and immediacy of traditional single-transistor boosters yet delivers predictable, stable performance, integration with modern pedalboard power supplies, and flexible placement within the signal chain. Housed in a compact, rugged enclosure with a subtle vintage aesthetic, it is built for studio use, stage reliability, and long-term durability. When paired with VOX amplifiers, the VTB-1 unlocks the dynamic, touch-sensitive, harmonically rich overdrive that helped shape the golden age of British rock tone, now presented with a level of refinement suited for today’s players.
With vintage treble boosters historically rare, costly, and often sonically unpredictable, the VOX VTB-1 brings their expressive sound and unmistakable presence back within reach, delivering an authentic yet modernized interpretation designed to live confidently on contemporary pedalboards.
For more information on the VOX VTB-1 Treble Booster, please visit NAMM Booth #6802 or online at www.voxamps.com.
Street Price: $149.99 USD
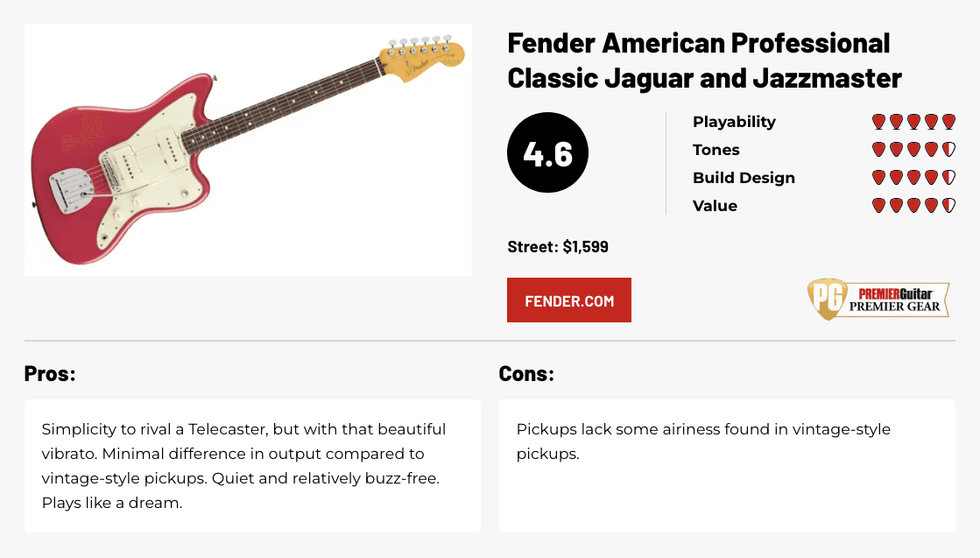
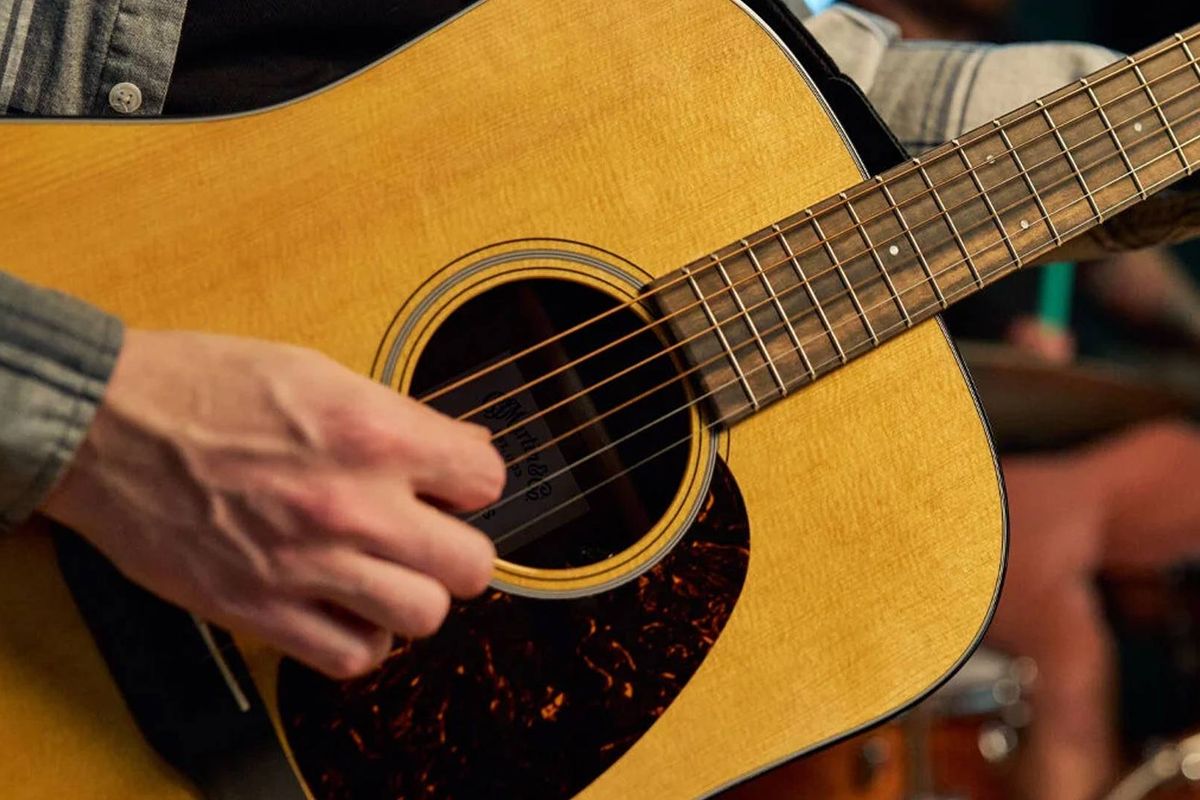
Fender American Professional Classic Jaguar and Jazzmaster Review
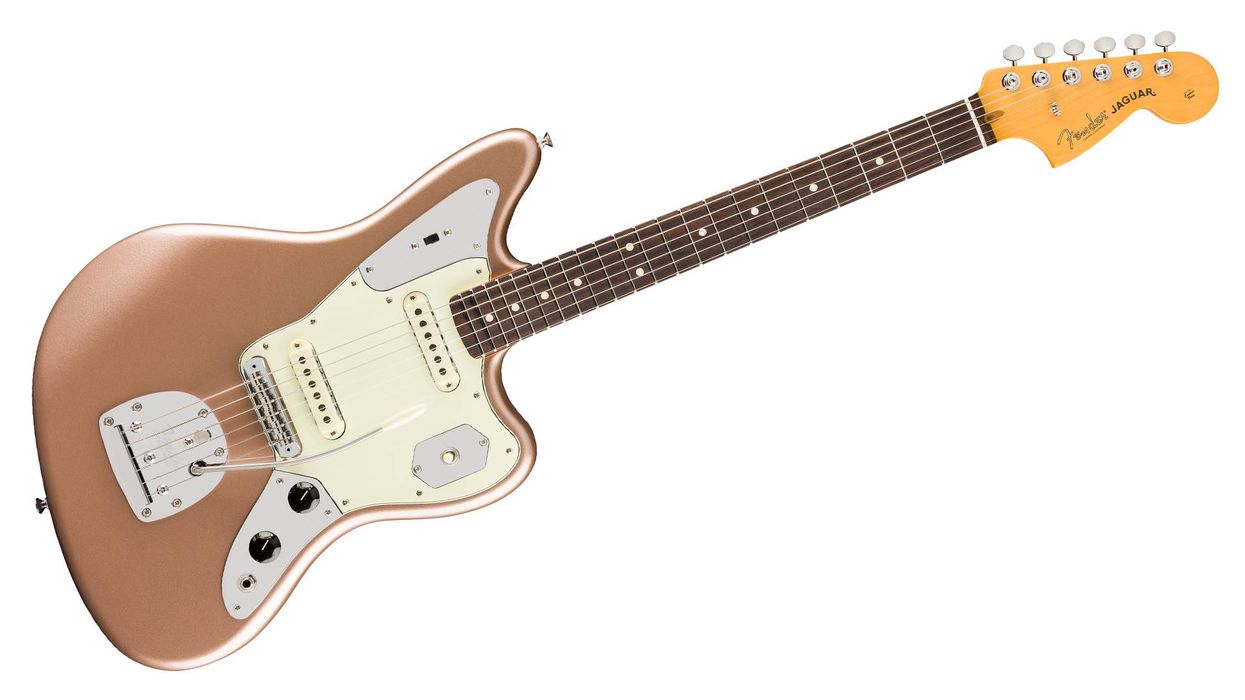
When I was young, I thought guitarists that considered Jazzmasters and Jaguars junk were stodgy, stuck-in-the-mud grumps. In retrospect—and after many decades of Jaguar and Jazzmaster wrestling—I can concede that some of their arguments had merit. Original Jaguar and Jazzmaster vibratos are indeed idiosyncratic things. The rhythm circuits can bleed tone energy. But to the extent such arguments might be true, I still consider these limitations potential strengths, depending on one’s approach.
In many ways, the American Professional Classic Jaguar and Jazzmaster could be compromises designed to appease my contrary young self and all the guitar shop owners that insisted I needed a Stratocaster instead. Both guitars eliminate the rhythm circuit. Each substitutes a Mustang-style bridge for the sometimes cranky, clattery Jazzmaster unit. And both boast features that reflect contemporary shifts in guitar-design trends. The pickups are overwound relative to vintage spec and use Alnico 5 magnets, giving each guitar a meatier voice at most settings. Fretboards are a flatter 9.5", with medium-jumbo frets. But outwardly, each guitar exudes an early ’60s design spirit. The changes will be obvious to seasoned, vintage-oriented Jazzmaster and Jaguar heads, some of whom will cry foul. But they could be very appealing to those who have yet to give the offset twins a shot.
Of Colors and Cost Strategies
Cruising Fender’s website these days is a lot like taking a trip to the candy store: colorful and brimming with temptation. In practical terms, though, Fender’s abundance of choices can make for a complex decision matrix—and that’s before you consider the many appealing Squier offerings. On the Fender-branded Jaguar side, the new American Professional Classic fills an obvious hole between the Mexico-made Player II ($869) the ’70s spec Mexico-made Vintera II ($1,569) and the U.S.-made Johnny Marr Jaguar ($2,699). Fender’s Jazzmaster options are more extensive. The American Professional II Jazzmaster offers modernizing enhancements like the Panorama vibrato and V-Mod pickups for just less than $2K. The ’50s and ’60s spec Mexico-made Vintera II’s are about $1,300. And then there’s the American Vintage II 1966 Jazzmaster at $2,729.
Curiously, at the time of this writing, there are no U.S.-made Jaguars or Jazzmasters built to late ’50s or early ’60s specification outside Custom Shop offerings. Obviously, the new American Professional Classic Jaguar and Jazzmaster aren’t vintage-correct options either (there’s even a maple neck and a black pickguard in the mix to further confuse matters). But if these instruments lack vintage electronics, there’s little arguing their vintage-cool good looks, especially in faded firemist gold, faded sherwood green metallic, and faded dakota red finishes. These guitars might be simpler versions of their vintage predecessors, but leaning against an amp they still can yank at the heartstrings of a vintage-inclined Fender aesthete.
Killer Kitty
Even now, decades into its return to the limelight, the Jaguar remains an odd fit for some players. It was passed over when Fender issued the American Vintage II line—a shame given what a great guitar the original American Vintage Jaguar is. The move suggested the model might be waning in popularity for a second time. But while this Jaguar still might not win over players that won’t mess with the short 24" scale and the guitar’s unique tone signature (punchier and thicker than a Stratocaster, but more focused than a Jazzmaster), those that are less rigid about such things could find much to love.
Switching between 25 1/2" and 24" scales isn’t completely effortless. If your playing style is based on refined technique developed over years on a longer-length scale, it can be problematic. But as a player who moves regularly between Jaguars, Jazzmasters, and Telecasters, I can attest that it is a surmountable problem, and can even be a source of inspiration. (If you don’t believe me, ask Marc Ribot or Mike Campbell).
“Vibrato, which can be less than totally stable on some models, is a star on the American Professional Classic.”
That sense of possibility is compounded by this Jaguar’s inviting playability. The modern “c” neck profile, as Fender calls it, feels a lot like other Jaguars of recent vintage. It isn’t chunky, but it also doesn’t feel too slight, the way some old Jaguars and Mustangs can. The satin neck is fast, and the medium-jumbo frets and short scale conspire to make string bending and vibrato feel natural and effortless. If your mind and muscle memory can overcome the short scale obstacle, you’ll find the American Professional Classic Jaguar a cool and comfortable alternative vehicle for exploring leads and jazzy chord extensions. Additionally, the vibrato, which can be less than totally stable on some models, is a star on the American Professional Classic. It stays where you left it, doesn’t rattle, and is butter smooth.
Growl, Howl, and Purr
The Jaguar’s Coastline pickups are discernibly hotter than vintage Jaguar pickups and vintage-spec replacements. For players that find a classic Jaguar’s voice too thin, this will be a welcome change. These pickups are louder and throw more weight around in the low-mid zone—a potential boon for folks that like a Jaguar’s fast feel but crave more body. The Coastline pickups retain that profile when distortion and fuzz enter the mix, too. More vintage-minded tone chasers might be less charmed. Vintage and vintage-style Jaguar pickups may seem thin by some standards, but they leave a lot of room for additional voices in a band or song arrangement, have a bell-like purity, and bloom beautifully when you add spring reverb—or any time or modulation effect—in copious quantities. But when you play an old-school Jag side-by-side with the American Professional Classic you’ll hear the difference, and it would be wise to check out both guitars at a shop if you can to see where your tastes fall.
If the Coastline Jaguar pickups don’t nail classic Jag sounds, the way they work with the guitar’s simplified controls could make the American Professional Classic Jaguar more versatile for many players. With the onboard Greasebucket tone circuit (which preserves low-end clarity as you roll back treble) and the bass-cut “strangle” switch, which Fender wisely preserved and positioned on the upper bout control plate, you can reshape this Jag’s output in many ways without turning it to mud. The sounds may be slightly different from those of a vintage Jag, but there are many to explore.Jazzmaster Made Simple
If the American Professional Classic Jaguar is a simpler evolution of its predecessor, the Jazzmaster entry in the series is the kind of offset that could make a Telecaster or Esquire fan cheer. Apart from the Greasebucket tone circuit control and the volume, there’s not much to this very straight-ahead instrument. And in the absence of any controls on the upper bout section of the pickguard, the American Professional Classic Jazzmaster presents a bit like a no-frills Chevrolet to a vintage model’s bells-and-whistles Cadillac. But even as one of those sickos that likes and uses the rhythm circuit on a Jazzmaster, I found the economy of design here very appealing.
“The Greasebucket tone control is a perfect fit for this instrument.”
With so few variables in the mix—the lovely vibrato is about the only other thing to distract you—there isn’t much to consider outside what is coming out of your amplifier speaker at the moment, and in the case of the American Professional Classic Jazzmaster it’s satisfying stuff. For starters, the Coastline ’65 versions of the Jazzmaster pickup are very quiet compared to vintage Jazzmaster models—which are, famously, not very quiet at all. You can park this Jazzmaster in the bridge- or neck-only pickup positions without fear of rendering your clean tone a sea of buzz. But unlike the Jaguar, the difference between the Coastline ’65 pickups and the pickups in the American Vintage II ’66 Jazzmaster is much less pronounced. Like the Jaguar’s Coastline pickups, the Jazzmaster’s are a little less airy in the top end and more focused in the midrange, resulting in a slightly less expansive tone profile. But there’s much less difference in output. In fact, in some situations the American Vintage II Jazzmaster used for comparison seemed louder.
The Greasebucket tone control, meanwhile, is a perfect fit for this instrument. It’s especially effective in bridge pickup settings, which can be pretty piercing at full tone and volume settings, and its mellowing effects yield copious subtle but effective color shifts in all three pickup positions that are conducive to dynamic moves within a tune.
Playability on our review specimen might be even nicer than that on the Jaguar, which is saying a lot. The modern-c profile seems like an especially nice fit for the 25 1/2" scale and the medium-jumbo frets lend a balanced, effortless feel to the instrument. It’s a joy to play.
The Verdict
Even dyed-in-the-wool vintage Jaguar and Jazzmaster players will have a hard time arguing with the charms of these two guitars. Both are a delight to play, are tuning stable—even when you get loony with the vibrato—and are well-crafted, high-quality instruments. They compel you to play as well—even if that faded Dakota red looks a bit more like coral pink mixed with a light tomato cream sauce.
There are other aesthetic gripes than vintage-minded Fender-philes could reasonably submit: The black pickguard on the sunburst models results in an odd mashup of ’60s and ’70s design elements, and I’m sure more than a few folks would rather see the lake placid blue model with a rosewood neck. A small minority of players will miss the rhythm circuit switching, and a greater number will prefer that a more old-school pickup voicing was on offer—particularly on the Jaguar. But in terms of bringing practical, performance-oriented changes to two beloved models with dedicated cult followings, Fender threaded the needle gracefully here. And at $1,599 each, they’ve managed a fair price for a couple of beautiful, reliable, Corona, California-made instruments.
Warm Audio Announces the Fluff Drive Signature Pedal from Ryan “Fluff” Bruce
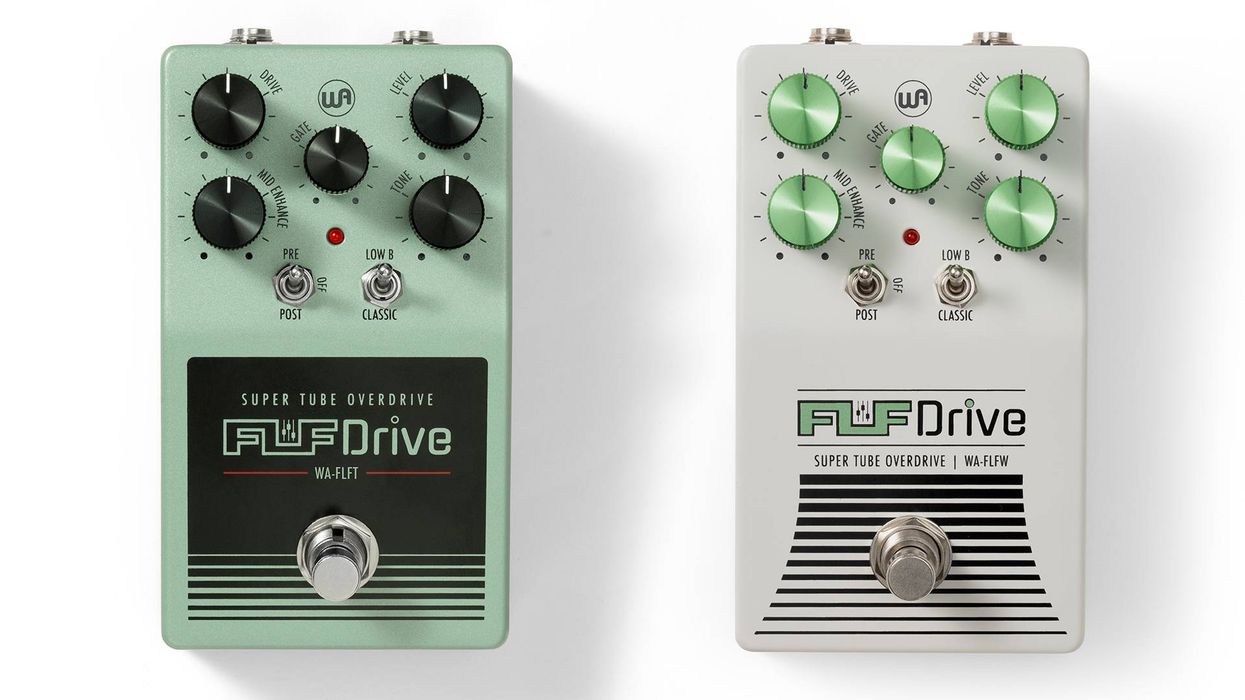
Warm Audio, the leading manufacturer of faithful recreations of legendary recording gear and guitar pedals, has announced the release of the Limited Edition Fluff Drive. It’s the company’s first signature pedal created with Ryan “Fluff” Bruce of Riffs, Beards & Gear—one of the most trusted and wildly popular voices in heavy guitar tone and pedal reviews. Warm Audio and Fluff have taken a classic high-gain staple and upgraded it with essential metal-ready mods, turning a fan-favorite circuit into a modern powerhouse.
A signature screaming overdrive dialed in specifically for metal and high-gain guitar, the Fluff Drive takes a legendary ’80s platform and elevates it with amp-driving power, a modded mid-enhance circuit and low-boost control, and a high/low noise gate. After pushing thousands of pedals to their limits, Fluff added critical mods and helped refine this legendary circuit into a stompbox that delivers the aggressive mids, tight punch, and instant clarity that modern rigs demand. The Limited Edition Fluff Drive (MSRP $199 | 219 € inc. VAT | 209 £ inc. VAT)) is available exclusively at Sweetwater in the US and at authorized retailers worldwide.
“I’ve tested a ridiculous number of pedals over the years, so when it came time to do a signature drive, I knew I needed a partner who actually cares about components and understands what makes the legendary circuits legendary. Warm Audio was that perfect partner,” said Ryan “Fluff” Bruce. “They’re obsessed with the details and are circuit-obsessed enough to dig deep into every diode and resistor, but also experienced enough to help me nail the classic sound players expect.”
Fluff continues, “Together with them, I wanted to fix every issue I’ve ever had dialing in metal tones on similar pedals or even the original. Warm worked with me on even the tiniest modification until the pedal did exactly what I always wished those circuits would do. The Fluff Drive is the result: the classic vibe, but with the ideal controls for metal implemented the way I’ve always wanted.”
The Fluff Drive is a signature pedal built from real-world experience, delivering the fast, focused midrange and tight low-end response metal and hardcore players rely on to push amps into controlled chaos. Its upgraded design includes a modded low-boost circuit for down-tuned guitars, baritones, and 7–8 string clarity; a pre/post mid-enhance switch for shaping attack and presence; a high/low/off noise gate for everything from crushing palm-mutes to wide-open leads; and an 18V voltage-boost mode for added headroom and cleaner gain. Premium analog components, including JRC4558 op-amps, discrete transistors, JFETs, and an internal voltage-doubler supply, ensure the pedal slots effortlessly at the front of any high-gain rig, hitting an amp hard and driving power tubes into rich saturation far beyond standard preamp gain. The result is the punch, response, and tonal control Fluff demands in his own setups.
Like all Warm Audio gear, every single Fluff Drive is meticulously hand-tested and inspected by trained technicians with a passion for making music in Austin, TX, and comes with a 5-year warranty. The Limited Edition Fluff Drive is available in two colors: Teal (WA-FLFT) and White (WA-FLFW). Both MSRP $199 | 219 € inc. VAT | 209 £ inc. VAT) are available at launch exclusively at Sweetwater in the US and specific authorized retailers worldwide. For more information, visit www.warmaudio.com/Fluff-Drive.
Eastman Introduces the FullerTone Offset

Eastman today announced the newest addition to its FullerTone lineup: the FullerTone Offset Solid Body Electric Guitar. Designed by Otto D’Ambrosio, the FullerTone Offset completes the FullerTone family alongside the Single Cut and Double Cut models, bringing all three of D’Ambrosio’s signature body designs together in a unified series focused on playability, tone, and modern design.
The FullerTone Family
With the introduction of the Offset, all three of Otto D’Ambrosio’s signature body designs are now available as part of the FullerTone Series. While each model offers its own visual identity and feel, all share consistent design principles centered on comfort, tonal balance, and refined construction. The FullerTone Offset is available in Dakota Red and Gold colors.
Player-Focused Offset Design
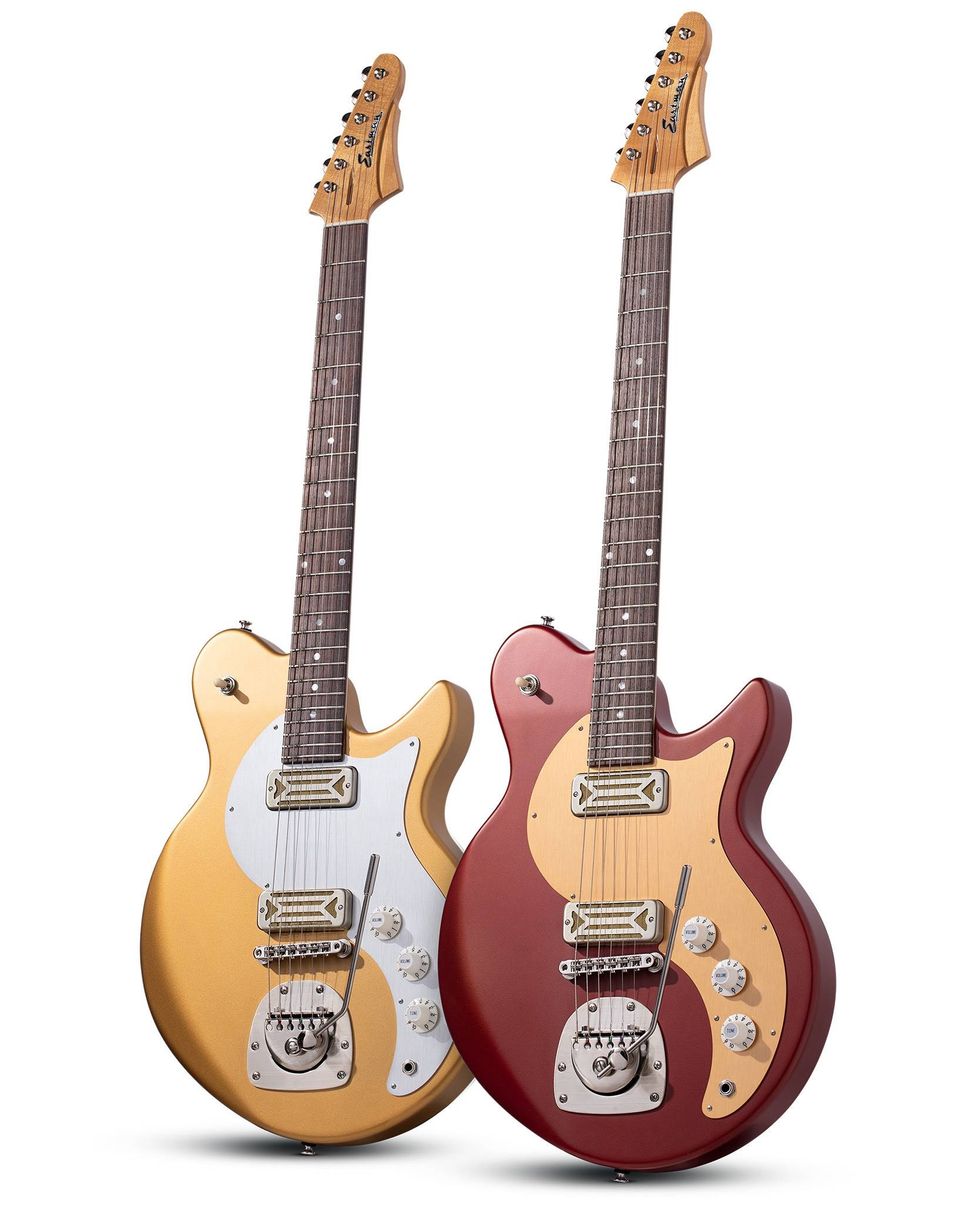
The FullerTone Offset features a newly developed body shape that emphasizes comfort and balance. Its sleek, curvaceous silhouette is the most ergonomic Eastman electric guitar body to date and was shaped through close collaboration with guitarist and educator Paul Davids. Drawing on Davids’ hands-on experience as a professional player, the design prioritizes real-world comfort and extended playability. Sculpted contours and a beveled back allow the guitar to sit comfortably against the body whether standing or seated, helping to reduce fatigue during longer playing sessions while maintaining a familiar, modern feel.
“It was a sheer pleasure working with Paul Davids to gain his player’s perspective on the Offset,” said Pepijn ’t Hart, Eastman’s Director of Fretted Instruments. “While every player has different preferences, his insights and direction helped us create our most ergonomic body shape to date.”
Electronics and Hardware
The FullerTone Offset is equipped with Tonerider soapbar-sized, goldfoil-covered humbuckers, selected for their warmth, clarity, and articulate response. A Göldo DG Tremolo provides smooth vibrato performance with dependable tuning stability, supporting a wide range of expressive playing styles.
“Not just another asymmetrical shape, the new FullerTone Offset embodies an ‘off-the-beaten-path’ sensibility that reflects your unique relationship to music,” said Otto D’Ambrosio, Eastman’s Chief Guitar Designer. “Inspired by the sounds of alt-rock pioneers, these modern-day classics simplify and amplify your musical expression in a sea of symmetry.”
FullerTone Two-Bolt Neck System
At the core of the instrument is Eastman’s proprietary FullerTone two-bolt neck system. This long-tenon design increases neck-to-body contact to enhance resonance and sustain while allowing precise adjustment. The system also features a smooth, unobstructed heel, providing improved upper-fret access and a stable, responsive playing feel.
Availability
The FullerTone Offset will be available in the Spring through Eastman Authorized Dealers worldwide.
For more information and pricing, visit www.eastmanguitars.com
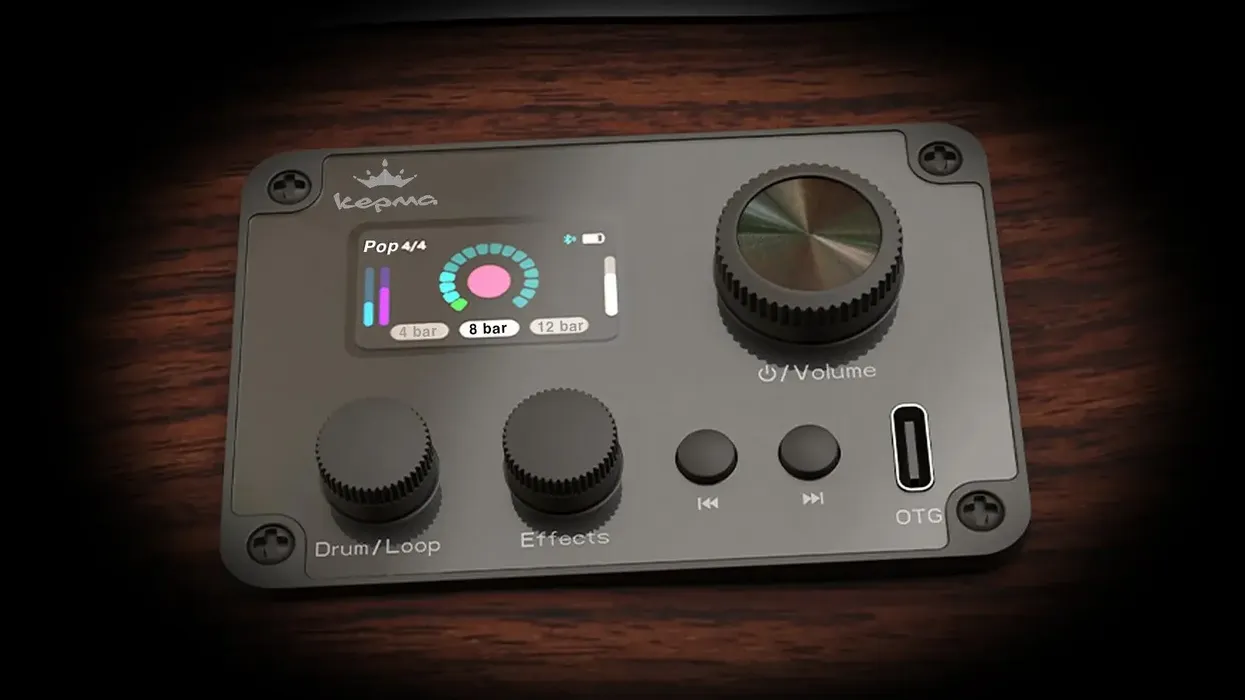
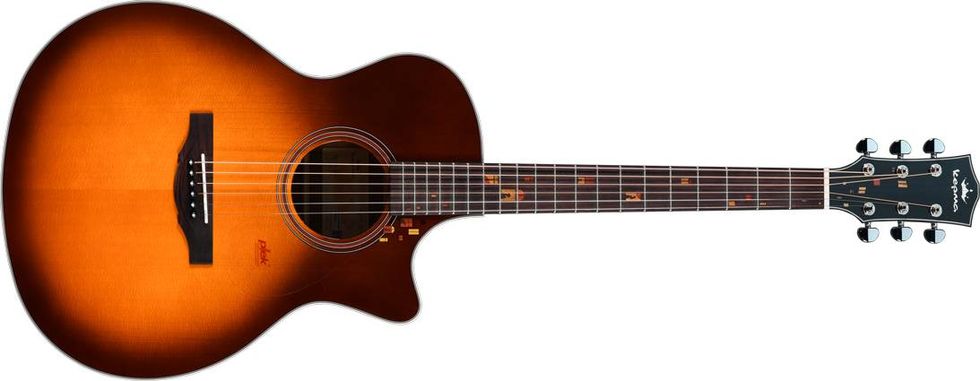
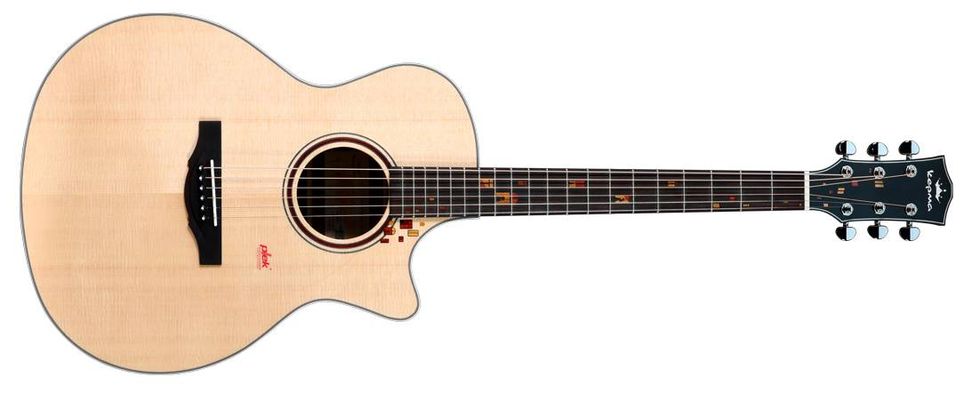
Kepma Guitars Introduces the F2S Lamplight Grand Auditorium Acoustic-Electric Guitar
Kepma Guitars proudly announces the F2S Lamplight, a Grand Auditorium acoustic-electric guitar that blends visual artistry, advanced tonewood engineering, and cutting-edge performance technology into a single, inspiring instrument. Designed for players who value both sound and storytelling, the F2S delivers refined craftsmanship, modern playability, and creative freedom for stage, studio, and home use.
Uncompromising Craftsmanship
The F2S Lamplight features a Grand Auditorium body shape paired with a solid torrefied Sitka spruce top and torrefied Sitka spruce bracing, delivering enhanced resonance, stability, and a mature, played-in tone from day one. Kepma’s proprietary torrefication process removes excess moisture and organic compounds from the wood, improving strength, tonal response and long-term consistency across varying environments.
Back and sides are constructed from Ovangkol laminate, finished in high-gloss for visual depth and tonal balance, while the gloss-finished top enhances projection and articulation. A solid rosewood bridge and natural bone saddle ensure optimal string energy transfer and sustain.
The mahogany neck is reinforced with two carbon fiber rods and a two-way adjustable truss rod, offering exceptional strength, stability, and long-term reliability. A 2mm-thick engineered ebony fingerboard with a glossy finish provides a smooth, precise playing surface, while PLEK®-optimized playability ensures accurate fretwork and effortless action right out of the case.
Distinctive Design and Premium Appointments
The F2S stands apart visually with refined, story-driven aesthetics and premium details throughout:
- Lamplight solid wood inlay crafted from African Padauk and Boxwood, creating a striking and symbolic visual centerpiece of captivating windows sparking curiosity
- Natural mother-of-pearl accents for an elegant, high-end appearance
- Ivory white one-piece molded ABS binding for durability, comfort, and clean lines
- Rosewood-grain pickguard that complements the guitar’s organic design
- 1:18 fully sealed chrome tuners for smooth, accurate tuning stability
- Angled nut slots and natural bone nut (25.5” / 647.25 mm scale length) for improved string alignment and tuning precision
- Matte-finished neck for a fast, comfortable feel
- Strap buttons included for immediate stage readiness
Bolt-On Innovation
The F2S incorporates Kepma’s bolt-on neck-body detachable technology, allowing for enhanced structural stability, easier servicing, and consistent neck alignment over time - a feature typically reserved for far higher price points.
L1 Smart Loop AcoustiFex® Pickup System
At the heart of the F2S Lamplight is Kepma’s L1 Smart Loop AcoustiFex Pickup System, a revolutionary system designed to expand creative possibilities:
- Professional Acoustic-Electric Performance The L1 functions as a high-quality pickup system, delivering natural, dynamic tone suitable for live performance, studio recording, and rehearsal.
- AcoustiFex Technology Using Kepma’s proprietary AcoustiFex technology, players can enjoy immersive effects such as reverb, delay and chorus without plugging into an amplifier, preserving the pure acoustic experience while adding depth and atmosphere.
- Built-In Loop Functionality The integrated loop feature allows players to record and layer their own accompaniment directly through the guitar, opening the door to songwriting, solo performance, and creative exploration.
Whether played unplugged or amplified with enhanced onboard effects, the L1 Smart Loop system transforms the F2S into a complete creative platform.
Strings, Protection, and Accessories
The F2S comes factory-equipped with Elixir® Nanoweb .13 - .52 coated strings, ensuring long-lasting tone and consistent feel, and includes an original Kepma gig bag for protection and portability.
Model and Availability
- F2S Lamplight Grand Auditorium acoustic-electric guitar featuring a solid torrefied Sitka spruce top, torrefied bracing, Ovangkol laminate back and sides, L1 Smart Loop Acoustic Exciter Pickup System, Plek® setup and premium Padauk and Boxwood inlays.
The FS2 Lamplight Grand Auditorium will be shipping in the U.S. in June of 2026. Pricing of the F2S with L1 pickup is $1399.99 MAP, and $1199.99 MAP without the L1 pickup.
For more information on Kepma USA products or to find a retail partner near you, visit kepmausa.com. Follow KepmaUSAOfficial on Facebook and Instagram.
Ibanez Announces New Mode Series Basses
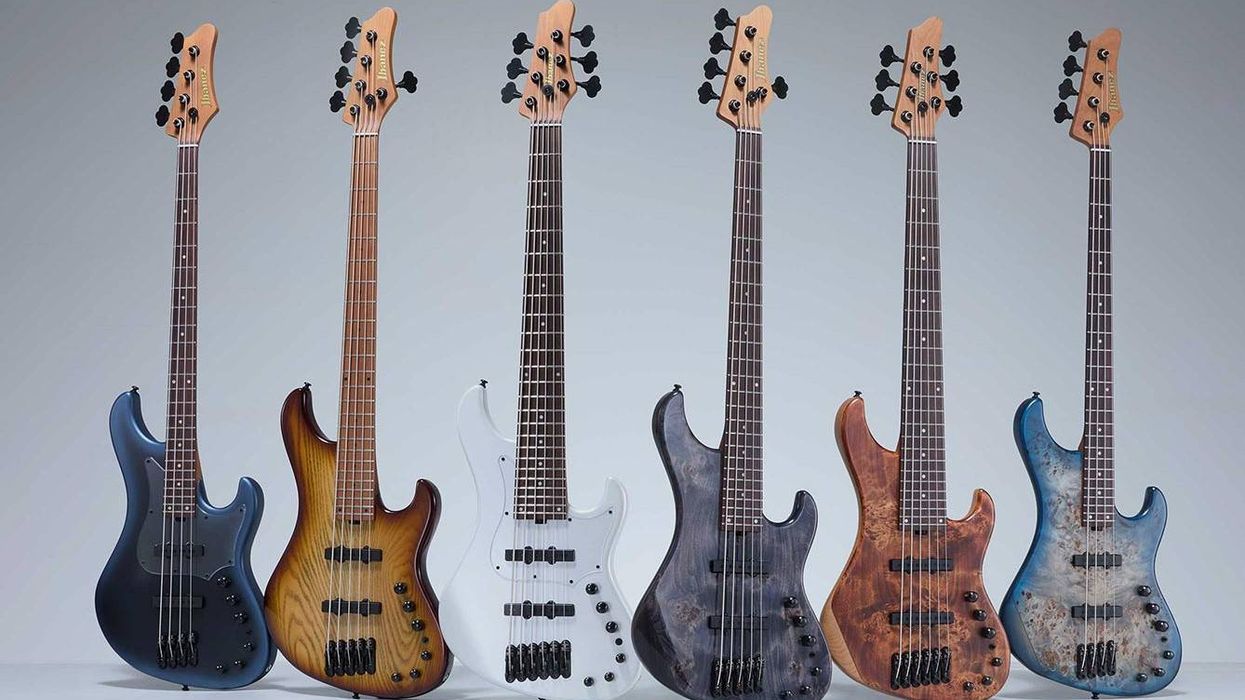
New for 2026, Ibanez has put their stamp on a definitive bass design with their new Mode series. Engineered to bridge the gap between traditional sounds and modern playability, the Mode Series offers a re-envisioned take on a style of bass that is essential to countless players and genres.
The new series comprises eight different models, all built upon a foundation of cutting-edge features and ergonomic design. Key among these is an ultra-modern, contoured body made of Alder or Ash that is specifically designed to accommodate the instrument's 24-fret neck; depending on the model, it features either a transparent finish over a Poplar Burl top or Ash body or a solid white finish on the MDM1000 series. The electronics package, including the pickups, was developed specifically for this new lineup. The Delta pickups are a split-coil design that provides the traditional brightness and cut of J-style pickups while offering full hum-canceling operation. Pairing them with the Sonictech S Preamp delivers incredible tonal versatility with a three-band EQ, master tone control, and the propriety Hexa-Mid system that offers six district bands of mid-range. The neck is crafted from Roasted Maple paired with a Rosewood or Roasted Maple fretboard, featuring a comfortable slim C profile that strikes the perfect balance between traditional feel and modern speed.
Other notable appointments include a passive tone knob with a push/pull active/passive switch for maximum tonal versatility, the MR5S Monorail Bridge for superior string isolation, luminescent side dots for stage visibility, and Ibanez’s new Aero-light Tuners.
Features
MDM1000
- MDM4 Roasted Maple neck
- Alder body
- Rosewood fretboard w/White dot inlay
- Medium Stainless Steel frets
- Delta S4J neck pickup
- Delta S4J bridge pickup
- Ibanez Sonitech S Preamp 3-band EQ
- EQ bypass switch (push/pull)
- 3-way Mid frequency switch w/Hexa Mid system
- MR5S bridge (19mm string spacing)
- Black hardware
- Ibanez Aero-light machine heads
- Luminescent side dot inlays
- Gig bag included
- Recommended case: MRB350C/MAP: $259.99
- Finishes: Midnight Ocean Arctic Matte, Pearl White
LIST PRICE: $1,653.32
ESTIMATED STREET PRICE: $1,199.99
MDM1005
- MDM5 Roasted Maple neck
- Alder body
- Rosewood fretboard w/White dot inlay
- Medium Stainless Steel frets
- Delta S5J neck pickup
- Delta S5J bridge pickup
- Ibanez Sonitech S Preamp 3-band EQ
- EQ bypass switch (push/pull)
- 3-way Mid frequency switch w/Hexa Mid system
- MR5S bridge (18mm string spacing)
- Black hardware
- Ibanez Aero-light machine heads
- Luminescent side dot inlays
- Gig bag included
- Recommended case: MRB350C/MAP: $259.99
- Finishes: Midnight Ocean Arctic Matte, Pearl White
LIST PRICE: $1,791.10
ESTIMATED STREET PRICE: $1,299.99
MDM1006
- MDM6 Roasted Maple neck
- Alder body
- Rosewood fretboard w/White dot inlay
- Medium Stainless Steel frets
- Delta S6J neck pickup
- Delta S6J bridge pickup
- Ibanez Sonitech S Preamp 3-band EQ
- EQ bypass switch (push/pull)
- 3-way Mid frequency switch w/Hexa Mid system
- MR5S bridge (18mm string spacing)
- Black hardware
- Ibanez Aero-light machine heads
- Luminescent side dot inlays
- Gig bag included
- Recommended case: MRB350C/MAP: $259.99
- Finish: Pearl White
LIST PRICE: $1,928.88
ESTIMATED STREET PRICE: $1,399.99
MDM1300
- MDM4 Roasted Maple neck
- Ash body
- Roasted Maple fretboard w/Black dot inlay
- Medium Stainless Steel frets
- Delta S4J neck pickup
- Delta S4J bridge pickup
- Ibanez Sonitech S Preamp 3-band EQ
- EQ bypass switch (push/pull)
- 3-way Mid frequency switch w/Hexa Mid system
- MR5S bridge (19mm string spacing)
- Black hardware
- Ibanez Aero-light machine heads
- Luminescent side dot inlays
- Gig bag included
- Recommended case: MRB350C/MAP: $259.99
- Finish: Natural Stained Amber Burst
LIST PRICE: $1,791.10
ESTIMATED STREET PRICE: $1,299.99
MDM1305
- MDM5 Roasted Maple neck
- Ash body
- Roasted Maple fretboard w/Black dot inlay
- Medium Stainless Steel frets
- Delta S5J neck pickup
- Delta S5J bridge pickup
- Ibanez Sonitech S Preamp 3-band EQ
- EQ bypass switch (push/pull)
- 3-way Mid frequency switch w/Hexa Mid system
- MR5S bridge (18mm string spacing)
- Black hardware
- Ibanez Aero-light machine heads
- Luminescent side dot inlays
- Gig bag included
- Recommended case: MRB350C/MAP: $259.99
- Finish: Natural Stained Amber Burst
LIST PRICE: $1,928.88
ESTIMATED STREET PRICE: $1,399.99
MDM1600
- MDM4 Roasted Maple neck
- Poplar Burl top/Alder body
- Rosewood fretboard w/White dot inlay
- Medium Stainless Steel frets
- Delta S4J neck pickup
- Delta S4J bridge pickup
- Ibanez Sonitech S Preamp 3-band EQ
- EQ bypass switch (push/pull)
- 3-way Mid frequency switch w/Hexa Mid system
- MR5S bridge (19mm string spacing)
- Black hardware
- Ibanez Aero-light machine heads
- Luminescent side dot inlays
- Gig bag included
- Recommended case: MRB350C/MAP: $259.99
- Finish: Natural Mocha Low Gloss, Cosmic Blue Starburst Low Gloss
LIST PRICE: $1,928.88
ESTIMATED STREET PRICE: $1,399.99
MDM1605
- MDM5 Roasted Maple neck
- Poplar Burl top/Alder body
- Rosewood fretboard w/White dot inlay
- Medium Stainless Steel frets
- Delta S5J neck pickup
- Delta S5J bridge pickup
- Ibanez Sonitech S Preamp 3-band EQ
- EQ bypass switch (push/pull)
- 3-way Mid frequency switch w/Hexa Mid system
- MR5S bridge (18mm string spacing)
- Black hardware
- Ibanez Aero-light machine heads
- Luminescent side dot inlays
- Gig bag included
- Recommended case: MRB350C/MAP: $259.99
- Finish: Natural Mocha Low Gloss, Deep Twilight
LIST PRICE: $2,066.65
ESTIMATED STREET PRICE: $1,499.99
MDM1606
- MDM6 Roasted Maple neck
- Poplar Burl top/Alder body
- Rosewood fretboard w/White dot inlay
- Medium Stainless Steel frets
- Delta S6J neck pickup
- Delta S6J bridge pickup
- Ibanez Sonitech S Preamp 3-band EQ
- EQ bypass switch (push/pull)
- 3-way Mid frequency switch w/Hexa Mid system
- MR5S bridge (18mm string spacing)
- Black hardware
- Ibanez Aero-light machine heads
- Luminescent side dot inlay
- Gig bag included
- Recommended case: MRB350C/MAP: $259.99
- Finish: Natural Mocha Low Gloss
LIST PRICE: $2,204.43
ESTIMATED STREET PRICE: $1,599.99
For more information visit Ibanez.com.
Tech 21 SansAmp Programmable Bass Driver & Geddy Lee Amalgamation Signature Chorus
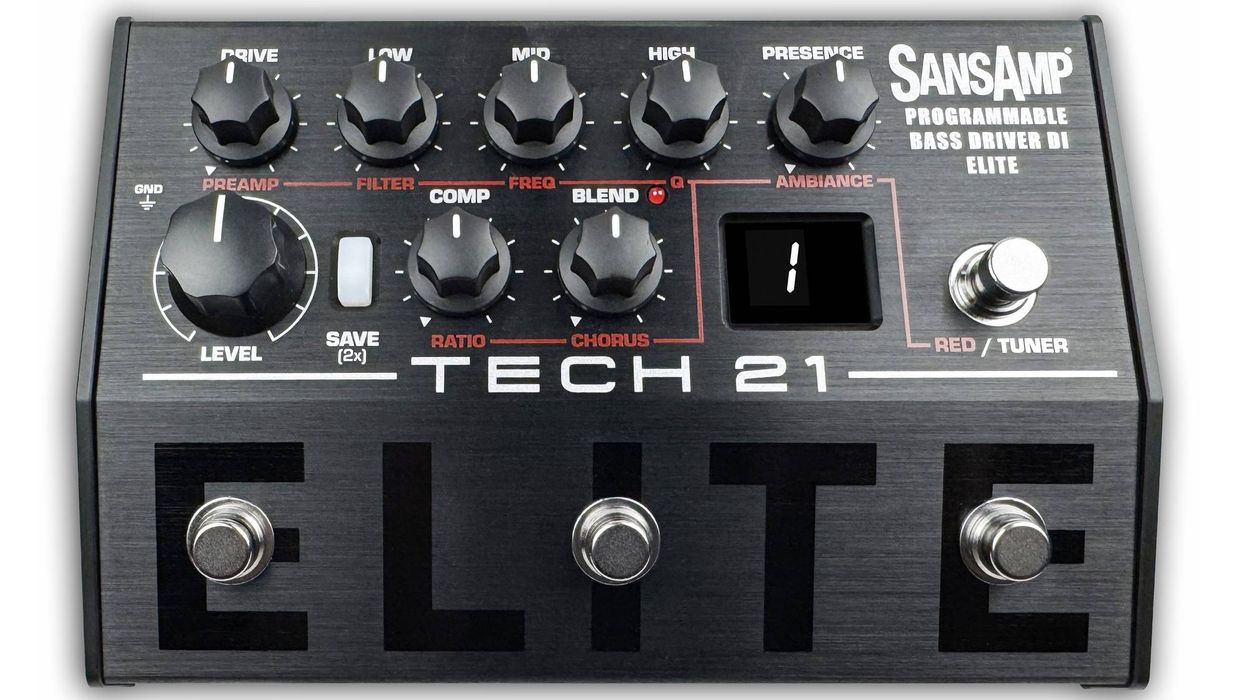
Just as the original SansAmp was a personal mission to encapsulate tube amplifier sounds in a compact, portable pedal, inventor Andrew Barta has long been on a quest to do the same in the digital domain. Never one to jump on a bandwagon, Barta wouldn’t “go digital” until he found a way to replicate the dynamics, responsiveness and fluidity of its analog counterpart.
The SansAmp Programmable Bass Driver ELITE has two modes: Performance mode to have your 3 main presets at the ready and Studio mode for up to 128 locations for custom presets. Controls include Drive, Presence, Blend, Compressor, 3-band active EQ, and Level.
There’s an additional “Red” mode that switches the functionality of the controls to include Preamp, Filter, Frequency, Q, Ambiance, Ratio and Chorus. It can also activate pre-programmed Chorus and/or Filter effects.
The MIDI interface enables deep editing of parameters for amplifiers, blendable IRs, effects and EQ. The IR section includes a SansAmp IR, a curated collection of modifiable IRs, the ability to custom blend them, as well as upload your favorite external IRs. Clear, uncomplicated graphics, and intuitive controls provide ease of use to achieve your desired tones.
Other features include a chromatic tuner, effect loop, 1/4-inch and XLR Outputs, and rugged all-metal housing. Utilizes included 9V DC auto-switching power supply with interchangeable international plugs for use anywhere in the world. Measures 7.5”l x 5.25”w x 2.0”h.
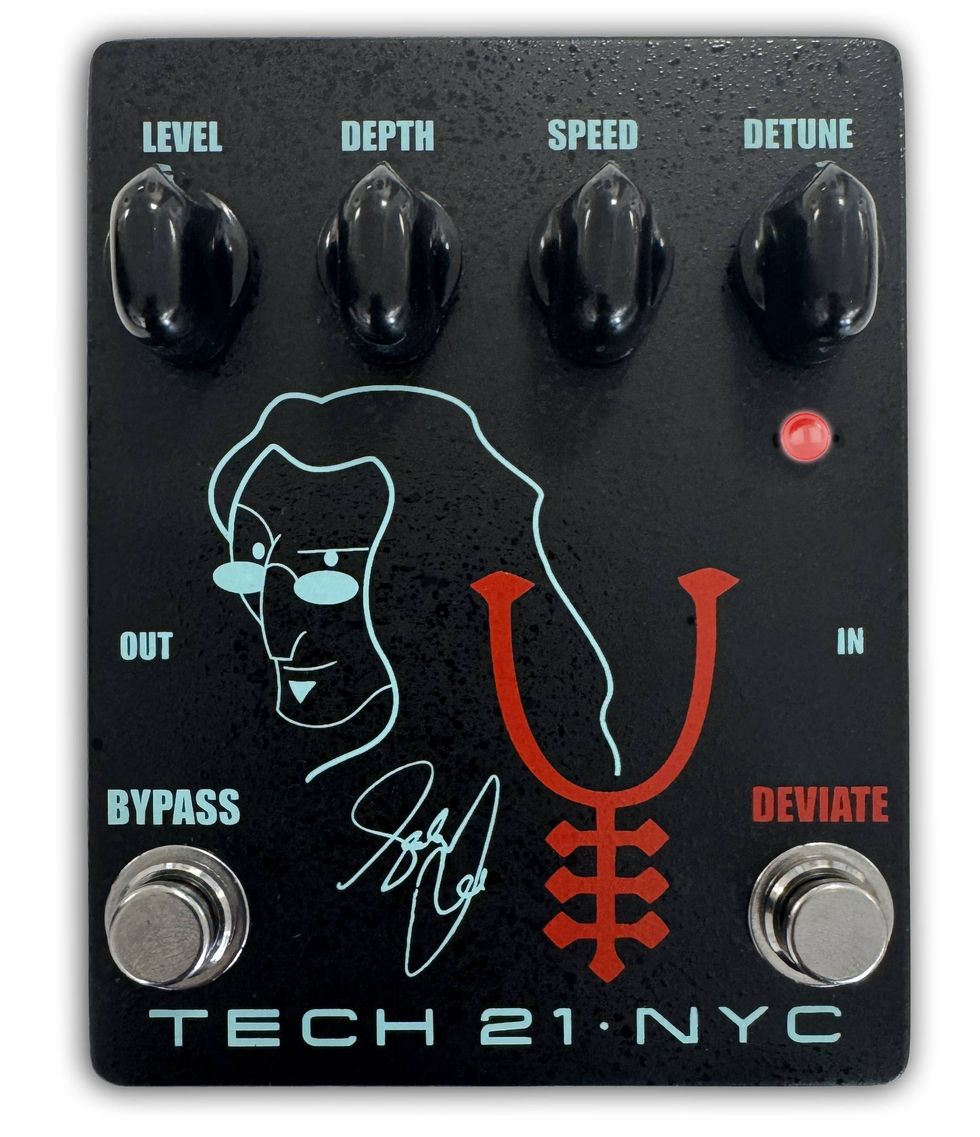
The Geddy Lee Amalgamation Signature Chorus, as one would expect, is specifically tailored for bass. And specifically, with Geddy's valuable input.
Housed in a compact pedal, the Geddy Lee Amalgamation offers an unusual amount of flexibility to achieve a variety of choral effects. It is capable of recreating the kinds of choral tones typically attainable only in a pro studio.
With its Detune control, you can adjust the pitch of the choral voicing, adding sonic girth to create thick, lush, bass-compatible chorus. Engaging Deviate mode alters the Detune function and adds an additional voicing for even more depth --as if 3 people are playing at the same time.
Other features include Speed and Depth controls to adjust the modulation, from sober to slightly tipsy to downright "wobbly." Operable with 9V alkaline battery (not included) or optional DC power supply.
Electro-Harmonix Introduces the Effects Interface Hardware Plugin
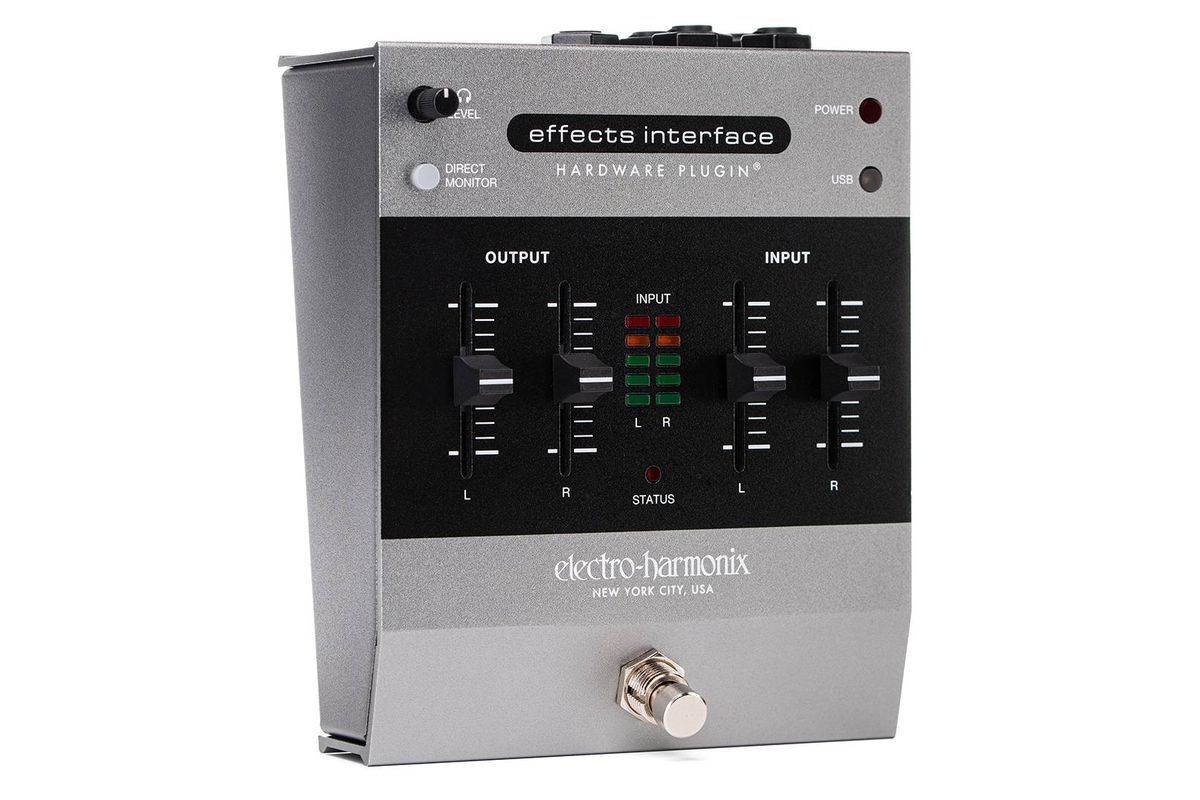
Connecting the worlds of pedals and plugins together with ease is the new Electro-Harmonix Effects Interface Hardware Plugin. Bringing universality to their Hardware Plugin concept, the Effects Interface allows the user to turn pedals into a plugin, or plugins into a pedal, while also being equipped as a 2-in/2-out interface. This pedal makes it easy to incorporate a whole pedalboard into your DAW session or incorporate plugins into your live setup for a completely hybrid rig with out the need for any additional converters or specialty equipment.
The Effects Interface operates in three distinct modes: Hardware Plugin Mode, Pedalboard Mode, and Interface Mode.
- Hardware Plugin Mode – Connect pedals to the Effects Interface’s loop and open the plugin in your DAW. Audio from your track will run through the pedals in the loop. Add your favorite pedal to single tracks or full bus mixes.
- Pedalboard Mode – Run input signal through plugins in your DAW and back out to your pedalboard or an amp through the Effects Interface. Place a plugin effect into your physical signal chain. Also useful for simple guitar re-amping.
This pedal-plugin pandora’s box ships with standard EHX 9 Volt power supply and USB-C cable, is available now and has a U.S. Street Price of $359.
VOX Introduces Hand-Wired AC30 Head and V212 Cabinet
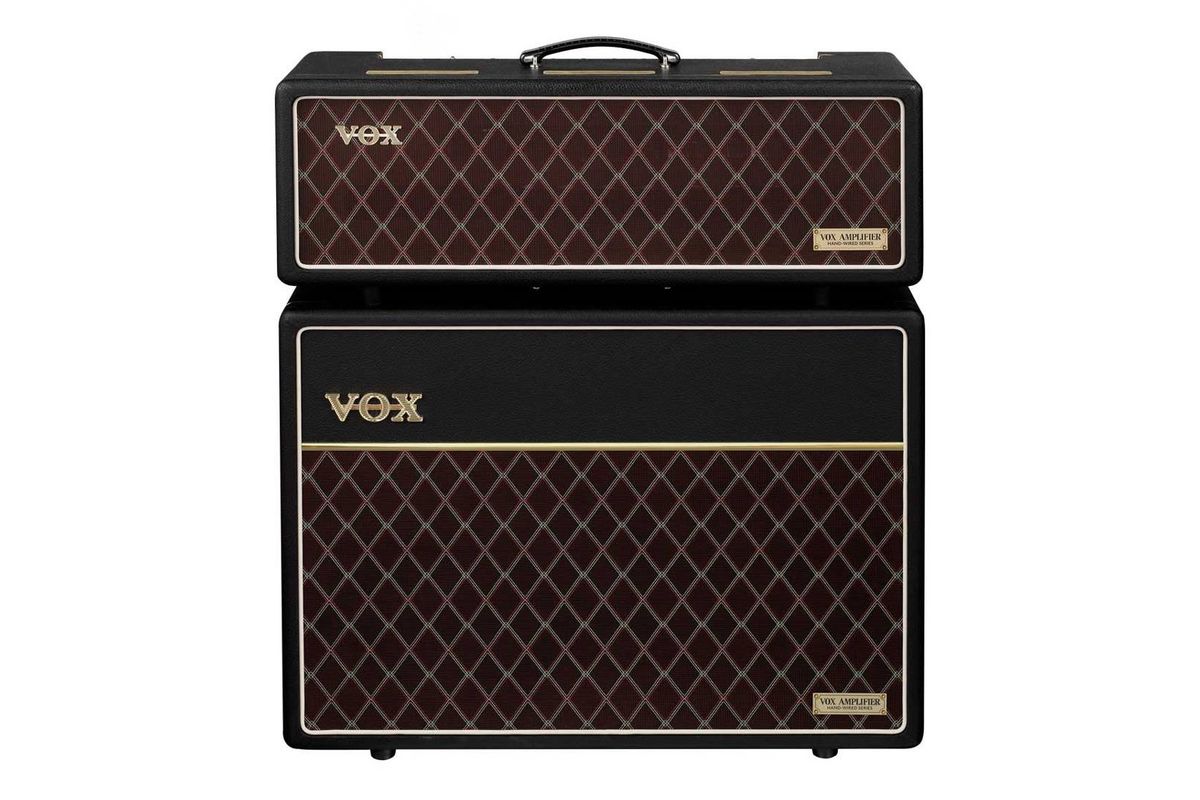
VOX announces the global debut of the AC30 Hand-Wired Amplifier Head and the matching V212 Hand-Wired Cabinet, two meticulously crafted additions to the company’s legendary AC Series. Engineered for serious players, recording engineers, and tone enthusiasts, these new models revive the spirit of the 1960s AC30 while delivering the reliability, flexibility, and performance demanded on modern stages and in contemporary studios. By faithfully reconstructing the original design, employing hand-wired circuitry, custom transformers, tube-driven spring reverb, and vintage-accurate cabinet construction, VOX has created a head-and-cabinet pairing that brings timeless tone squarely into the present day.
Few amplifiers have shaped music history like the VOX AC30, and the new AC30 Hand-Wired Head has been developed to honor that legacy with extraordinary attention to musical feel and authenticity. Designed as a complete reconstruction rather than a simple reissue, it features hand-wired circuitry and custom transformers, supported by modern refinements including a master volume that can be fully removed from the circuit when engaged at maximum setting, a transparent and fully bypass-able FET-buffered effects loop, and a custom-voiced spring reverb driven through a dedicated tube stage. Every element has been engineered to ensure that the unmistakable sound of a true vintage VOX experience is delivered with consistency and reliability.
Central to the amplifier’s sonic character is its 30-watt EL84 power section, supported by a GZ34 rectifier and a carefully developed power circuit designed to recreate the distinctive voltage “sag” that influences dynamics, sustain, and playing feel. The amp retains the expressive phase inverter behavior that contributes to the AC30’s complex harmonic response when pushed, offering the touch sensitivity, openness, and natural compression associated with sought-after early-1960s examples. A custom-wound output transformer further shapes the amp’s dimensional tonality, delivering bell-like highs, defined midrange character, and the layered harmonic bloom that players associate with classic VOX heritage, while keeping modern noise performance and stability.
The AC30 Hand-Wired Head offers two defining VOX channels. The Normal channel delivers warm, articulate tone with the choice of adding extra brilliance via a Bright switch, making it equally suitable for single-coil or humbucking pickups. The Top Boost channel provides the chime, clarity, and dynamic drive that has defined generations of British rock, with independent Treble, Bass, and Volume controls enabling precise tonal shaping from shimmering cleans to expressive vintage crunch. Supporting features include tube-driven reverb with Level and Tone control, footswitchable bypass, and versatile speaker outputs with compatibility for both 8- and 16-ohm cabinets. Measuring 27.76 by 10.35 by 11.89 inches and weighing 43.43 pounds, the amplifier is built with premium tubes including four ECC83/12AX7 preamp tubes, one ECC81/12AT7, four EL84 power tubes, and a GZ34 rectifier. The head ships with power cable, owner’s manual, VFS1 footswitch, and speaker cable.
Developed to be the ideal partner for the amplifier, the V212HWRX Hand-Wired Cabinet has been precision-designed to reproduce authentic VOX tone with authority, depth, and musical resonance. Far from being merely a housing for speakers, the cabinet construction itself was engineered through detailed study of original 1960s AC30 designs. Built from 12mm birch ply to match vintage specifications, it delivers an open, three-dimensional response that enhances clarity while keeping warmth and body. Inside, a pair of 12-inch Celestion Alnico Blue speakers provides the unmistakable sonic signature long associated with VOX amplifiers, featuring brilliant top end, smooth overdrive character, and rich harmonic response that complements the AC30 Hand-Wired Head perfectly.
Visually, both products pay tribute to VOX heritage. The amplifier features period-inspired styling elements such as copper control panel, brass vent accents, and traditional VOX branding, while the V212HWRX cabinet showcases diamond-pattern grill cloth and classic VOX identity. The cabinet measures 27.36 by 10.31 by 22.32 inches, weighs 40.79 pounds, and is rated for 30 watts RMS into 16 ohms. Together, the AC30 Hand-Wired Head and V212HWRX cabinet deliver not only tone and performance but an authentic connection to VOX’s iconic legacy.
With these releases, VOX offers players, collectors, vintage enthusiasts, and working professionals a faithful yet forward-thinking path to true AC-series tone in a flexible head-and-cabinet format.
For additional details, specifications, and availability information, please visit NAMM Booth #6802 or online at www.voxamps.com.
Street Price:
AC30 Hand-Wired Head $1999.99 USD
AC V212 Hand-Wired Cabinet $1499.99 USD
Martin Guitar Unveils Four All-New Models Ahead of The 2026 NAMM Show
C. F. Martin & Co.® today announced four new instruments debuting ahead of The 2026 NAMM Show: the Super D-18, Super HD-28, Martin O’ahu K-42 Hibiscus, and Custom Shop M Paisley Ember Burst. Following the recent launch of the refreshed Road Series, these additions mark another significant step forward for Martin in 2026, with one more major announcement planned during NAMM.
Super D-18 & Super HD-28
The Super D-18 and Super HD-28 build on the success of the Custom Shop Super D, Martin’s largest and most powerful body shape. With approximately 20% more internal air volume than a standard Dreadnought, the Super D delivers deeper bass, greater projection, and an extended dynamic range—while keeping the iconic silhouette intact. Acoustic testing showed gains of up to 12dB, offering more volume with less effort.
For 2026, Martin brings this groundbreaking body shape into the Standard Series for the first time, offering players Super D performance paired with classic 18- and 28-style appointments, with the Super D-18 (above) featuring solid spruce and genuine mahogany and the Super HD-28 (below) pairing solid spruce with East Indian rosewood—both powered by forward-shifted Golden Era scalloped X-bracing for exceptional responsiveness and tone.
Martin O’ahu K-42 Hibiscus
The K-42 Hibiscus expands the Martin O’ahu line with a design that reimagines the historic Kealakai-inspired body. A 12-fret body paired with a 14-fret neck—an unprecedented combination for Martin—shifts the bridge for added focus and projection. Broad-flamed koa back and sides, a reclaimed spruce top with a dark toasted burst, Style 42 appointments, Madagascar rosewood binding, and hibiscus fingerboard inlays make it visually striking and sonically rich. Limited to 100 instruments, it offers a blend of heritage, rarity, and modern craftsmanship.
Custom Shop M Paisley Ember Burst
Designed by Martin President and CEO Thomas Ripsam, the Custom Shop M Paisley Ember Burst features a custom Engelmann spruce top with a “Martin paisley” pattern incorporating historic snowflake and diamond motifs. Quilted maple back and sides and an Ember Burst finish create a unified, premium aesthetic. Forward-shifted Golden Era scalloped bracing produces clear, articulate tone, while flamed maple binding, abalone inlays, Waverly gold tuners, L.R. Baggs® Anthem™ electronics, and a hand-signed label elevate this one-year limited model for players and collectors.
A Strong Start to 2026
Following the recent launch of the refreshed Road Series, the debut of these four new instruments continues Martin’s strong start to 2026 and sets the stage for a standout showing at this year’s NAMM Show.
For more information, visit martinguitar.com.
Taylor Launches Next Generation Of Its Flagship Acoustics

Taylor Guitars has announced its most ambitious tonal expansion to date with two key launches: a Next Generation evolution of its flagship Grand Auditorium guitars and the growth of its heritage-inspired Gold Label Collection to include a trio of deeper-bodied square-shoulder dreadnoughts. This dual launch underscores Taylor's commitment to offer players the industry's widest spectrum of acoustic tonal possibilities, from cutting-edge modern acoustic performance to time-honored traditional tonal character.
“As guitar makers, we see the ever-wider variety of players and styles,” said Andy Powers, Taylor’s Chief Guitar Designer and CEO. “This means different types of sounds, feels and aesthetic presentations—all in step with the creative world of today’s players.”
EVOLVING A MODERN FLAGSHIP: Next Generation GRAND AUDITORIUMS

For more than 30 years, the cutaway Grand Auditorium body style has defined the Taylor brand—comfortable, musically versatile, and equally at home in living rooms, pro studios, and on big stages. Yet in keeping with Taylor’s ethos of continuous improvement, Andy Powers has continued to bring voicing enhancements to Taylor's most popular body style. The latest refinements arrive as a potent trio of performance-enhancing, “Next-Generation” innovations that fundamentally transform the feel, sound, and live performance utility, all while retaining the core identity that players love. Debuting in Taylor’s best-selling 300, 400 and 800 Series, including both Standard and Builder's Edition models, the Next Generation Grand Auditoriums combine Taylor’s patented Action Control Neck, a new scalloped variant of Andy’s V-Class bracing, and all-new Claria System electronics—with all three design breakthroughs working in harmony to inspire players by offering a richer, more expressive musical experience.
ACTION CONTROL NECKTM — The patented Action Control Neck features a long-tenon joint extending deeper into the guitar body for dramatically enhanced sustain, warmth, and resonance, while allowing instant, precise string height adjustments directly through the soundhole—with no string or neck removal required.
SCALLOPED V-CLASSTM BRACING — Working in harmony with the neck, a new scalloped V-Class bracing pattern lightens key brace zones for increased top movement and responsiveness, delivering the warmth and richness players crave with enhanced low-end response while preserving V-Class's renowned pitch accuracy, projection and sustain.
CLARIATM PICKUP SYSTEM — Finally, Taylor’s all-new Claria System electronics revolutionize amplified performance with an improved under-saddle piezo pickup paired with a proprietary onboard preamp that eliminates traditional piezo harshness. Discrete soundhole-mounted Volume, Mid-Contour, and Tone controls enable a wide range of tone-shaping—players will find it easy to quickly dial in their preferred sound in any type of performance venue, offering remarkable plug-and-play utility.
Next Generation Grand Auditoriums start at $2,499 and include:
- 314ce
- 414ce
- 814ce
- Builder’s Edition 324ce
- BE 814ce Indian Rosewood/Adirondack Spruce
- 324ce
- 454ce*
- 854ce*
- BE 814ce Honduran Rosewood Rosewood/Sinker Spruce
- BE 814ce Indian Rosewood/ Adirondack Spruce Blacktop
*These 12-string models feature standard V-Class bracing.
GOLD LABEL GROWTH: SQUARE-SHOULDER DREADS + NEW 900 SERIES MODELS
One year after its debut, Taylor’s Gold Label Collection, which draws inspiration from past eras of traditional, non-cutaway guitars, welcomes another body style to the family: a square-shoulder dreadnought with a deeper body that creates an acoustic powerhouse with pronounced warmth and projection. The new dreadnought models include three tonewood pairings: the mahogany/torrefied Sitka spruce Gold Label 510e, the Indian rosewood/torrefied Sitka spruce Gold Label 710e, and the Honduran rosewood/torrefied Sitka spruce Gold Label 810e. (One other dreadnought that sits alongside these models is the Trey Hensley Gold Label 510e, introduced in Q4 of 2025.)
The new Gold Label Collection guitars start at $2,799 and include:
Additionally, a pair of new Gold Label models debut at Taylor’s 900 Series level, featuring an ultra-premium blend of materials and aesthetic refinements. Models include two body styles: the Super Auditorium Gold Label 914e and Grand Pacific 917e. Both pair Honduran rosewood with Adirondack spruce and feature exquisite paua-shell trim along the top, fretboard and headstock, in natural or golden-brown sunburst finishes. All Gold Label models feature the collection's signature innovations: Fanned V-Class Bracing, the Action Control Neck, and heritage-inspired aesthetics.
“It’s like players are stepping into a different musical skin with our Gold Label guitars,” says Powers. “Songwriters, bluegrass players, Americana players, rhythm players, weekend strummers, worship leaders, all kinds of different players saying, ‘Wow, I love this sound. This is a whole different face of Taylor.’”
The Next Generation Grand Auditoriums and expanded Gold Label Collection models are available now at authorized Taylor dealers worldwide. For more information, visit TaylorGuitars.com. Follow Taylor Guitars on Instagram, Facebook, YouTube and TikTok.
Taylor Launches Next Generation Of Its Flagship Acoustics
Taylor Guitars has announced its most ambitious tonal expansion to date with two key launches: a Next Generation evolution of its flagship Grand Auditorium guitars and the growth of its heritage-inspired Gold Label Collection to include a trio of deeper-bodied square-shoulder dreadnoughts. This dual launch underscores Taylor's commitment to offer players the industry's widest spectrum of acoustic tonal possibilities, from cutting-edge modern acoustic performance to time-honored traditional tonal character.
“As guitar makers, we see the ever-wider variety of players and styles,” said Andy Powers, Taylor’s Chief Guitar Designer and CEO. “This means different types of sounds, feels and aesthetic presentations—all in step with the creative world of today’s players.”
EVOLVING A MODERN FLAGSHIP: Next Generation GRAND AUDITORIUMS
For more than 30 years, the cutaway Grand Auditorium body style has defined the Taylor brand—comfortable, musically versatile, and equally at home in living rooms, pro studios, and on big stages. Yet in keeping with Taylor’s ethos of continuous improvement, Andy Powers has continued to bring voicing enhancements to Taylor's most popular body style. The latest refinements arrive as a potent trio of performance-enhancing, “Next-Generation” innovations that fundamentally transform the feel, sound, and live performance utility, all while retaining the core identity that players love. Debuting in Taylor’s best-selling 300, 400 and 800 Series, including both Standard and Builder's Edition models, the Next Generation Grand Auditoriums combine Taylor’s patented Action Control Neck, a new scalloped variant of Andy’s V-Class bracing, and all-new Claria System electronics—with all three design breakthroughs working in harmony to inspire players by offering a richer, more expressive musical experience.
ACTION CONTROL NECKTM — The patented Action Control Neck features a long-tenon joint extending deeper into the guitar body for dramatically enhanced sustain, warmth, and resonance, while allowing instant, precise string height adjustments directly through the soundhole—with no string or neck removal required.
SCALLOPED V-CLASSTM BRACING — Working in harmony with the neck, a new scalloped V-Class bracing pattern lightens key brace zones for increased top movement and responsiveness, delivering the warmth and richness players crave with enhanced low-end response while preserving V-Class's renowned pitch accuracy, projection and sustain.
CLARIATM PICKUP SYSTEM — Finally, Taylor’s all-new Claria System electronics revolutionize amplified performance with an improved under-saddle piezo pickup paired with a proprietary onboard preamp that eliminates traditional piezo harshness. Discrete soundhole-mounted Volume, Mid-Contour, and Tone controls enable a wide range of tone-shaping—players will find it easy to quickly dial in their preferred sound in any type of performance venue, offering remarkable plug-and-play utility.
Next Generation Grand Auditoriums start at $2,499 and include:
- 314ce
- 414ce
- 814ce
- Builder’s Edition 324ce
- BE 814ce Indian Rosewood/Adirondack Spruce
- 324ce
- 454ce*
- 854ce*
- BE 814ce Honduran Rosewood Rosewood/Sinker Spruce
- BE 814ce Indian Rosewood/ Adirondack Spruce Blacktop
*These 12-string models feature standard V-Class bracing.
GOLD LABEL GROWTH: SQUARE-SHOULDER DREADS + NEW 900 SERIES MODELS
One year after its debut, Taylor’s Gold Label Collection, which draws inspiration from past eras of traditional, non-cutaway guitars, welcomes another body style to the family: a square-shoulder dreadnought with a deeper body that creates an acoustic powerhouse with pronounced warmth and projection. The new dreadnought models include three tonewood pairings: the mahogany/torrefied Sitka spruce Gold Label 510e, the Indian rosewood/torrefied Sitka spruce Gold Label 710e, and the Honduran rosewood/torrefied Sitka spruce Gold Label 810e. (One other dreadnought that sits alongside these models is the Trey Hensley Gold Label 510e, introduced in Q4 of 2025.)
The new Gold Label Collection guitars start at $2,799 and include:
Additionally, a pair of new Gold Label models debut at Taylor’s 900 Series level, featuring an ultra-premium blend of materials and aesthetic refinements. Models include two body styles: the Super Auditorium Gold Label 914e and Grand Pacific 917e. Both pair Honduran rosewood with Adirondack spruce and feature exquisite paua-shell trim along the top, fretboard and headstock, in natural or golden-brown sunburst finishes. All Gold Label models feature the collection's signature innovations: Fanned V-Class Bracing, the Action Control Neck, and heritage-inspired aesthetics.
“It’s like players are stepping into a different musical skin with our Gold Label guitars,” says Powers. “Songwriters, bluegrass players, Americana players, rhythm players, weekend strummers, worship leaders, all kinds of different players saying, ‘Wow, I love this sound. This is a whole different face of Taylor.’”
The Next Generation Grand Auditoriums and expanded Gold Label Collection models are available now at authorized Taylor dealers worldwide. For more information, visit TaylorGuitars.com. Follow Taylor Guitars on Instagram, Facebook, YouTube and TikTok.